


Soda: Twinkling Bunny

An old but gold unit resurrected — Soda: Twinkling Bunny is a shotgun-wielding character that batters her foes through charm and seduction. This lascivious Maid For You attendant boasts a convoluted routine revolving around Golden Chips, a stackable buff that unlocks additional effects for her skill and boosts her output tremendously. She also invites an innovative special ability that can extend the team's Full Burst duration, allowing for some avant-garde compositions.
Can you give a brief summary about this unit?
B. Soda is one of the two revolutionary units this season that patch the holes of the current SG composition. Full Burst Extension? That's something unheard of since the golden era of Modernia. Is that really that impactful? Yes. That's because we don't have CDR for this team. By only having a 50% Full Burst uptime, we were missing out on a lot of Full Burst buffs (i.e. multiplier, PrivM's S2). Now, with B. Soda, that problem is resolved. In fact, you can even argue that, when normalized, the Full Bursts are now longer than those from CDR teams!
B. Soda also possesses incredible DPS. While she does not rival overpowered marksmen like Red Hood and Alice, she is still a force to be reckoned with, as her primary support units are exclusive to the SG ensemble. She also acts as a support to them, forming a two-way relationship and garnering less competition.
However, she can only reach maximum performance if you have the required support units to bolster her. Instead of treating her as a unit, you should treat her + the other units as a team. She currently serves as a main DPS and a support character for Privaty: Unkind Maid (and non-CDR teams in general), and to deal damage, she wants no less than Tove. Since Tove relies on stacking and since SG team lacks survivability, you would also want to put B. Alice in the team. Last but not least, Leona also synergizes well with their CRIT-based kit and may improve the team's overall damage significantly when the increased damage distance is needed. Leona also benefits from Tove + B. Alice and will enjoy Tove's Burst Skill buffs permanently.
Should I pull this unit?
Our recommendation highly depends on your financial condition and personal goals. If you care a lot about Solo Raids and PvP, and have the freedom to invest thousands of resources into building a competent SG team, go ahead. Otherwise, you may want to hold off the trigger for now. Let's be real—B. Soda is an amazing competitor and a key role to SG teams, but to work, she needs other units invested, and she herself is also required for others to work. The number of investments levied by this entire one team is ridiculously high, if not the worst one in this regard. The tactical advantage? Well, in the real world, the most important thing is that these units are self-sufficient with their own proprietary supports, which means they do not compete against other teams for the best support units. This means they will always remain efficient, and the team will likely have consistent performance across raids where multiple teams are warranted. Meanwhile, the performance of other teams will fluctuate depending on their pairings.
To add, B. Soda is more geared toward late-game players with emphasis on Solo Raids. While there is no problem with using her as beginners, the prerequisites are seriously demanding. You do, however, get double returns as B. Soda is inherently good in PvP, able to serve as a versatile battery. This allows you to stack CP and gain a competitive edge over your opponents without having to invest again.
To close, we believe Soda: Twinkling Bunny is a valuable pull, but unless you have the units above and are willing to invest in them, the recommendation may not apply to you.
Kit Analysis
With a reload time and a normal attack modifier similar to Pepper's, at first glance, B. Soda looks like a deceptively modest character. Your suspicious is valid; she does exhibit some bizarre characteristics hidden from plain sight, which may be beneficial or detrimental to her performance. We are going to hash over them one by one toward the end of this section.
Free Economy Class

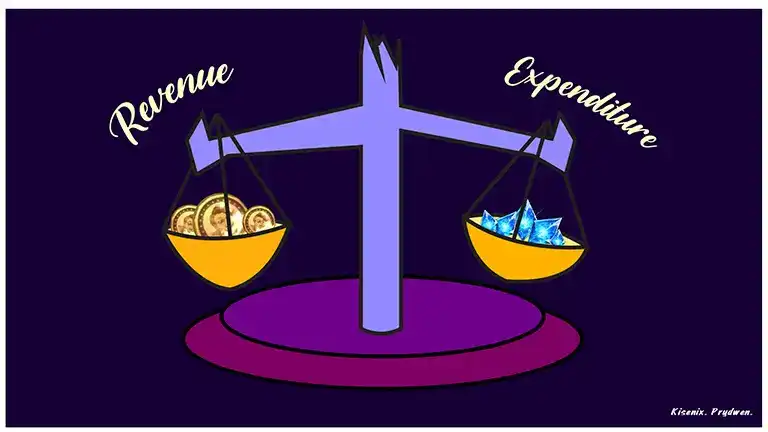
B. Soda's kit revolves around a stackable buff called Golden Chips, which she consumes partially when activating Burst Skill to enhance the special effects of her skills. This means her playstyle is about accumulating as many chips as possible. It's similar to how businesses work: revenue & expenditure. In this case, you cannot moderate the expenditure, but you can boost her revenue.
So, how does she gain Golden Chips? B. Soda accrues one stack for 3 normal attacks landed during Full Burst. With a regular fire rate of 1.5/s, B. Soda can gain a maximum of 15 chips over the span of 2 burst rotations (20 seconds + 10 seconds from S2). This is bad. Why? First of all, this assumes that she never reloads, and secondly, she spends 17 chips every time she uses Burst Skill. This means her expenditure is higher than her revenue. This is not a good financial outlook!
This is where Tove comes to the rescue (and Max Ammo OL, technically). With Tove, her fire rate rises to around 2.14/s (max level). This raises the cap from 15 to 21.4 chips, which means her revenue can now be higher mathematically.
But, is it the end of the world without Tove? Well, she initiates the combat with 40~50 Golden Chips depending on the level of S1. To activate all of the special effects of her skills, she needs at least 30. This means any loss of chips is fine as long as you can activate her Burst Skill for the final time while still having 30+ chips. The drawback of this compromise is that she will also enjoy less CRIT DMG buff from her S1, as she has fewer stacks on average throughout the battle. It's not that big of a deal, though.
All right, let's say you have Tove. Does that mean you don't have to worry about this? No, your predicament is far from ending. In fact, this is just one half of the issue as we assumed that Soda was continuously firing throughout the windows. In reality, she collects much fewer coins! Moreover, she suffers from a huge time penalty whenever she performs any reload (clip or full). This penalty is absent from other units. This is excluded from her stated reload time but can be shortened with Reload Speed buffs. This is the first "bizarre characteristic" we were talking about.
Padded Reload Animation
This extra reload animation costs 49 extra frames (±0.82s). To minimize this penalty, you would want to lessen the number of times she reloads, so only FULLY reload, never PARTIALLY! If you only fully reload, you can assume her reload duration will therefore be 2.03s + 0.82s + 0.18s (cover delay) = 3.03s. An interrupted single clip reload will take 2.03s / 3 + 1s = 1.68s.
Fortunately, you only have to make sure you have enough chips (30+) when activating her Burst Skill for the 5th time. Why 5th? With 20s per rotation (no CDR), your first B3 will be able to burst only 5 times, whereas your second B3 will be able to burst 4 times. B. Soda therefore has 4 instances of "2 rotations", during which she either gains or loses Golden Chips depending on your revenue & expenditure. If you are not satisfied, you can also utilize Max Ammo OLs to boost her uptime percentage.
For the full measurements, you can use our template calculator sheet. Make a private copy and input your own OL & skill values. Since Tove needs B. Alice for consistency, they will be treated as a pair.
The sheet also lays the foundation why we are suggesting 1~2x Max Ammo OL below. The uptime of a character determines how many shots they can land in normalized intervals, which is responsible for their DPS if their primary source of damage is through normal attacks, like B. Soda. While you can easily achieve chips requirements with invested Tove, you still need Max Ammo OL solely for DPS. However, there are diminishing returns.
How Hard Does She Smash?

We will never know unless we get isekaied. Jokes aside, she does pack quite a punch. No, she does not compete with Red Hood or Alice. Those are just too broken. But, she does rank quite high in our DPS leaderboard, better than an underpowered PrivM. This is due to multiple things: from having a balanced kit to having high basic attack modifiers. Her presence, though, boosts PrivM's DPS to her level, so their damage in the end will be similar (but that's thanks to B. Soda). She also siphons off proprietary support units inessential for other teams, which means she will always have access to the best supports all the time.
We will not be writing a lengthy essay on how she deals damage, but as long as you can maintain 30+ chips every time she activates Burst Skill, you are good to go. First of all, we have S2, which is her second source of modifier after her base attack modifier. While her base attack modifier is prone to losing damage from "missing", this additional modifier will always fully hit the enemy nearest to the crosshair. It cannot core-hit, but SGs have poor core-hit accuracy anyways. It should constitute around 37% of her overall damage but will this number will climb if she misses pellets. Note that the S2 modifiers need Time Extension state to be active (20+ chips when entering Burst Stage 3).
Next, the CRIT DMG from her S1. Well, the maximum value of this buff at 50 chips is formidable, but most of the time, you will have it hover between 33~50 due to the recollection mechanic we discussed earlier. CRIT is not a marvelous stat, no. But, it can be impactful for characters who don't regularly core-hit, or for when the boss has no exposed core (which is the Solo Raid trend recently). To benefit from this buff more, you want to give her CRIT Rate buffs from either OL or other allies, Leona in particular. Since the buff is permanent, CRIT Rate triggered at any point will undoubtedly raise her damage, not to mention that she also provides an Attack Damage buff.
Now, her Burst Skill is superb. It is her only source of bonus ATK (other than Tove) and Hit Rate. Bunny Soda isn't like PrivM, whose accuracy improves as she lands shots, so Hit Rate is rather an important stat. This also implies that, unlike PrivM, her DPS has a tendency to plummet against smaller enemies. Regardless, there will be a noticeable damage spike for the following 15s, but it is not going to be as major as Snow White's or Alice's, as her damage is quite stable. Since Burst Skill consumes Golden Chips, her S1 will be temporarily weaker during her Burst rotation.
Adept at "Extending" Things
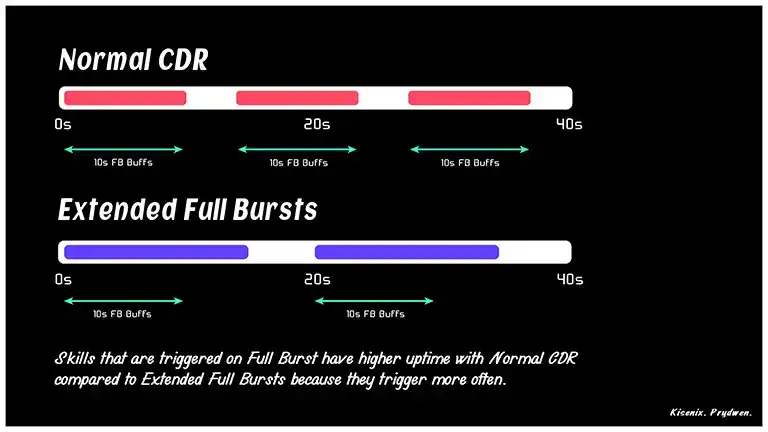
One of Bunny Soda's focal interests is her Full Burst Extension mechanic, which has never been sighted since the vintage era of Modernia. We know that Full Burst(s) themselves grant a 0.5x damage multiplier to the whole team, which is pretty big. CDRs help activate skills and Full Burst(s) more often, so everyone can benefit from the bonus multipliers. That being said, now we are being introduced to a revamped non-CDR team by means of Full Burst Extension by yours truly Bunny Soda.
Full Burst Extension is another form of masked damage boost that increases the uptime of Full Burst by extending it. It shares a similar effect with its antique counterpart; that is making the 0.5x damage multiplier more accessible. However, there is one fundamental disparity between CDR and Extensions. Most skills that are tied to Full Burst, when activated, only last for about 10-15 seconds. CDR helps increase the uptime of these skills by allowing you to trigger them more often. Extensions don't do that. Another one is that extensions also forbid you from spamming Burst Skill(s). With CDR, you can achieve 12-13 burst rotations, but Extension still limits you to 9.
Due to this, she doesn't synergize well with CDR units and units whose DPS is stored in their Burst Skill (assuming CDR exists). The resulting fewer activations of FB Skills/Burst Skills (as shown in the illustration above) will constrain them.
How does this affect our modern SG team? Well, as you may have guessed, no CDR is perfectly compatible in this team. There is always a lack of power with any choice, from healing to playability—none of them is adequate. Bunny Soda addresses that.
Bunny Soda is also a premier support for PrivM. PrivM has a skill that allows her to accumulate a high amount of ATK by landing pellets during Full Burst. However, this only lasts a short time, and the second Full Burst ends, it is already on the brink of expiring. With Full Burst Extension, PrivM can benefit from a maxed ATK buff longer. In fact, this strategy was recognized by many during Crystal Chamber's Solo Raid.
In conclusion, B. Soda is not only a mighty DPS but also a much necessary support for the SG team. Without her, the team will suffer from a critical DPS loss.
Tier List
Bugged Evaluation
We discovered that, in PvP, if her S1 is Level 7+, the ATK buff in her Burst Skill actually affects the preliminary AoE, but we are unsure if it is a bug. In PvE, this phenomenon happens regardless of S1 level. Normally, units with AoE Screen Wipe do not get to enjoy buff effects that activate at Full Burst for their AoE attacks. Hence, until we get clarification, we will NOT consider it for evaluation. If this issue is not addressed after some time, we will designate it a feature.
Campaign (LD) - A
Soda is not the worst unit to begin with. She has a screen wipe and can extend your Full Burst by 5s. This is useful for teams without CDR, if you don't have one. However, she also doesn't really offer much when it comes to damage. The ATK built into her Burst Skill shouldn't strengthen her AoE attack and is exclusive to her follow-up normal attacks only. The problem with that? She has bad accuracy, as with other common shotguns, not ideal for small targets. Furthermore, in Campaign, we don't usually use Tove, which means sooner or later we will encounter Chips Accumulation issue, which will render her skills powerless. Still, she provides an ATK Damage buff, so that does make her stand out a little more.
Campaign (HD) - A
Her rather low ATK value will restrict her output too much in High Deficit. Here, instead of a main B3, you can think of her as very similar to Drake, who is a sub-DPS who also provides a small ATK buff to team and provides chip damage. Similarly, B. Soda provides Attack Damage buff to team and can do decent chip damage.
Boss (Solo) - SS
One of the enablers for SG team. While the SG team is not going to be compatible against Far Range, slim bosses like Stormbringer, they will definitely have their say everywhere else, especially when there is a boss without core. B. Soda allows SGs to shine brighter with Full Burst Extension, providing PrivM extra ATK buff uptime and the team higher DPS multiplier overall. She (and the entire SG team) also has exclusive support units, making them viable in Solo Raids as their performance will be stable (and you don't need to worry about other teams becoming weaker because you are pairing the DPS with a different support structure).
Boss (Adds) - S
B. Soda is more optimal against solo bosses because her accuracy is not as good as PrivM's at base form. Her wipe can help deal with mobs. Full Burst Extension also allows you to more easily manage whom to shoot with your team. However, SG in general is bad for bosses with extra mobs, so this rating is for B. Soda outside her fabled SG team.
PVP - S
Armed with a Clip SG, B. Soda enjoys bonus points enough to immediately place her high in the Tier List. For people with a complete roster, she will commonly serve as a battery. Her AoE has low values but can be valuable in certain situations, especially if it can dispatch weakened enemies. She is also of Iron type, so she deals bonus damage to Electric Nikkes (which are common there). She is also a buffer and can empower units whose main source of damage is during Full Burst, but the buff is a bit weak, so don't expect miracles. The 15s Full Burst extension can help boost your team output, but it might not be suitable for two-burst teams.
If the bug we mentioned above is a feature, she can be used similar to some SS-tier Nikkes such as Maiden or Maid Privaty, who also are SGs with AoE nukes. However, she will give you flashbacks towards an old Nikke—2B—since Rosanna can dispel Soda's Golden Chips stacks, indirectly taking out what's crucial from her skillset, the ATK buff. Hence, be careful when using her in PvP, and ideally do not use B. Soda as a Main B3 unit but rather as a burst generation battery instead.
Investments
Gear Investments
As per usual, upgrade the necessary gear to increase her base ATK. For the OLs, aim for as many high-level lines as possible as they now affect CP, and you are going to use B. Soda for Arena most likely.
- 1-2x MAX AMMO, to allow her to recollect enough chips within two burst rotations. 1x is the minimum amount and should be sufficient, but more is never bad. More Max Ammo also allows B. Alice to reload more ammo at once via S2.
- 4x ATK, because who doesn't like ATK? B. Soda's will only have a high amount of ATK during the first 10s of any Full Burst (ft. Tove) and 15s of her own Full Burst. ATK will augment her damage outside these windows.
- 4x ELEMENTAL, because Elemental DMG is just too precious and rarely diluted. It will also give an advantage in Arena because many of the current meta units belong to the Electric element.
- 2-3x MISCELLANEOUS, which can be more Hit Rate or CRIT Rate. They will slightly elevate her DPS. CRIT DMG should not be a target because she already has high built-in CRIT DMG, but it is not offensive.
Skill Investments
- Skill 1: 4/7
- B. Soda needs chips for her kit to work. Skill 1 will determine if she will have more chips at the beginning of the battle. If her chips dip under 30 when it is her turn to Full Burst, you have successfully sabotaged her. Thus, this skill has High Priority.
- Level 4 gets you 45 chips initially, which are more than enough with adequate OL lines and invested Tove. Otherwise, you may want Level 7 (50 chips) to minmax for more Critical DMG. You can always refer back to our sheet.
- There is a mysterious interaction that lets her screen wipe be affected by her ATK buff if leveled above 7+. If this is a feature, we will raise the minimum & recommended to just Level 7. This will also affect the Suggested Progression Path.
- Skill 2: 7~10
- This skill boosts her base normal attack modifier and is stronger than it looks like, especially if not all your pellets land. This is because it is unaffected by her (in)accuracy.
- Level 10 is the endgame. Prioritize after Skill 1.
- Burst Skill: 4~10
- Higher levels = higher Hit Rate and ATK buff. No actual breakpoints; she still loses 17 chips per use. Upgrade as your resources allow. We recommend settling at around 7 to save Gold Books, but feel free to go beyond.
Suggested Progression Path
PVE investment
4/4/4 → 4/7/7 → 4/10/7 (→ 7/10/10)
PVP investment
4/4/4 → 7/4/7 → 7/4/10 (→ 7/10/10)
Priority
High (Late Game)
Cube Investments

Due to the extra reloading animation imposed on B. Soda, we want to avoid reloading as much as possible.
- Bastion remains the best cube and is miles better than the other options.
- Resilience is second best. No questions asked.
- Technically, you can also use Quantum for PvP (if that extra juice is needed).
PvE Team Compositions
Team #1: One We Have Coveted Since 2023
Burst 1
Burst 1
Burst 2
Burst 3
Burst 3
The BiS team for Soda. The SG God Comp. We have a unique support structure in B.Alice, Tove and Leona supporting two strong SG DPS units. This is what you will see being used in Solo Raids or Union Raids due to the support structure not clashing with the 3 strongest pairs: School Girls, Crown and Bunnies. Hence, the SG God Comp stands as a strong contender for Team 4/5 in Solo Raids!
Team #2: The Utopian Dream of SG Copers
Burst 1
Burst 1
Burst 2
Burst 3
Burst 3
Remember Crown? You probably do. This team is more for waifu > meta players who want to see our beloved SG waifus shine as bright as they can. Crown allows for the highest DPS for your SG DPS units! While they still can't compete against RedHood or the like, they can come in striking distance, especially if the element favours Maid Privaty!
Team #3: The Copers Used to Swear By This
Burst 1
Burst 2
Burst 3
B3
Burst Flex
Basic structure of the old SG team, with Soda as main B3. Marciana heals, but can be replaced by B.Alice after she is released. The B3 can be any shotgun, but the top picks are MPrivaty and Sugar.
Team #4: Soda: Teknikel Supod
B1
Burst 2
B3
B3
Burst 3
Enough about Bosses. Another Crown comp, but this time it's for campaign. But, it is not necessarily a Crown comp. The basic structure is "B1 - B2 - B3 - B3 - Soda", so you can fill in the rest of the team with what else you have available, as long as you follow the basic rules of making effective team comps. Soda acts as a support B3, providing Attack Damage buffs from her Skill 1, as well as extended FB duration. This extended FB duration is especially useful if you lack CDR units for your team, since you get to have an extended period of time where the Full Burst damage multiplier will be active! Due to a possible bug, Soda may be used as a main B3 as a Screen Wipe as well due to the ATK buff she gets from her S1.
PvP Team Compositions
Team #1: Fus So Dah!
Burst 3
Burst 2
Burst 3
Burst 2
Burst 1
3RL team, can reach 2.5RL if against opponents that feed into Jackal. High power nuke, similar to those of Maid Privaty, Maiden, or Harran. B.Soda has lower final value of nuke compared to if using the other units, however has higher follow-up DPS compared to others (if used with Blanc).
Team #2: Sacrifice, Revival, and Punishment
Burst 2
Burst 3
Burst 2
Burst 1
Burst Flex
3RL team, turns into 2-2.5RL if any of the SG units other than B.Soda die fast enough but only if Rosanna S2 is invested into. Preferably, also invest in Rosanna Burst. Rosanna nukes 2 opponents, xAnne provides an ATK buff to Soda, and together they destroy the opponent team! The sacrifice is usually important for this team to work effectively, hence it is mostly for attacking purposes. Remember that if Soda dies, she loses her stacks and in turn loses the ATK buff from her AoE!
Team #3: Battery for Lust
Burst 1
Burst 2
Burst 3
Burst 3
SG
SG is any of the Clip SGs. 3RL team. You do not have to force yourself to use Soda as a Main B3 since she can prove to be a weaker option compared to other Main B3 options. Just using her as a Burst Generation Battery is absolutely fine.
Team #4: Respecting Traditions
Burst 3
Burst 2
Burst 1
Burst 3
Burst 3
2.5RL Classic SG team with nuke. Extremely high pressure on P5/P1 depending on whether you are attacking or defending. Even if they block SGs in p1/p5 with makima or with biscuit+defended, we have Pepper with her nuke, as well as a follow up nuke from Soda! And don't forget, even if Soda dies, we have Privaty ready to rock her opponents with her nuke instead!
Pros & Cons
Pros
- Her normal attack modifier is very high, and Skill 2 adds to it.
- Since her ATK buff is isolated within her Burst Skill, she scales hard with ATK buffs (but beware of dilution from Tove).
- Provides Attack Damage buff to herself and another unit with the highest ATK.
- Personal Hit Rate buff helps dealing with enemies that are far away or have small hitboxes. With 44% HR from OL, she should have a smaller spread than a normal AR, allowing her to get core hits against mid-range enemies.
- Exclusive supports unwanted by other teams (except B. Alice), which allows her performance to be consistent and not be subject to inferior pairings.
- Clip SG so her burst gen is very high, excellent for PvP!
- Extends FB by 5s, therefore removing the need of CDR. Appropriate for beginners without good CDR units.
- Burst Skill deals good damage in PVP due to her own ATK translated into her wipe. (Possible Bug)
- HUGE ASSETS!
Cons
- She has an absurd delay between reloads, which can be reduced with reload speed buffs. The more you force her reload, the more time she will just sit there and do nothing before reloading. Hence, manually using her can be a DPS-loss.
- Requires very high investments, both in skill levels and OL gear.
- No chips, no special effects = crippled. The best way to prevent that is by pairing her with Tove, who is highly dependent on B. Alice. The interdependence of these units limits adaptability.
- Most buffs provided by supports do not last 15s, which means the FB extension can be critically bad to most teams, reducing her flexibility!
- She is an SG, hence she feeds into Jackal in PvP, and is susceptible to Scarlet S2.
- Wipe strength in PvP can be suppressed by Rosanna. (Related to Bug)
- SG's natural accuracy is poor, so even if she can give herself Hit Rate, it is still quite inaccurate.
- Non Soda-like facial expressions.