


Mast: Romantic Maid


Can you give a brief summary about this unit?
Mast: Romantic Maid is special in that she is strong but only when paired with her associate, Anchor: Innocent Maid. She is usable without her but only in specific comps, which may not be available at all times, so this review will mostly talk about her strength when they are used together. El Macho!
Mast Maid is a 40s B2 buffer who buffs the team through debuffing herself with Drunken, which reduces Hit Rate. The more Drunken stacks she has, the stronger her buffs become. Upon reaching 3 stacks, Drunken stacks will clear at the end of Full Burst and turn into Hangover, stunning her for a whole 10 seconds. This interferes with her output, prevents her from contributing in burst gen, disables the use of her B2 skill, and tampers with the effectiveness of her buffs. Thankfully, Anchor: IM saves the day just in time by keeping her stacks right below the threshold of triggering Hangover, maximizing the buffing potential Mast has without all the downsides.
Now, what is the catch? Well, first of all, if Anchor: IM dies, then Mast will not receive the debuff stack reduction from Anchor, which means she will trigger Hangover, and the run becomes invalid. Additionally, since Anchor: IM and Mast: RM are both 40s B2, it is ideal to pair them together in contents where you need to set up multiple teams, like raids. Besides, these cuties need to stack before their buffs become impactful, which makes them less viable in short battles like Campaign and PvP.
However, you might ask: does that mean they cannot be used independently? Not really. As you see, Anchor with her strong Burst Skill can be used in PvP alone, while Mast, despite her self-debuffing tendencies, can still join an already set 1-1-2 team as an off-burst B2 or occasional B2. She does get stunned, yes; she partially loses her buffs, yes. But, the gain for SBS, at least for some players, has proven more beneficial. If paired with Crown in this position, she rivals Crown + HelmTr. Note that your mileage may vary. Mast is also an investment-sensitive unit.
Now, let’s talk about their good things. The Maids have an exquisite kit that revolves around Distributed Damage▲, Reload Speed▲, and Healing, two of which possess great value. Aside from the totally not massive ATK buffs that are very easily diluted, Distributed Damage▲ is a superb buff that acts like Damage Taken. DD damage dealers are not common per se, but we have a unit who excels in that, Scarlet: Black Shadow. Since Anchor's DD buff enters at the start of Full Burst, you want to pair them with units that deal DD not mainly from Burst Skill.
Besides this, we are also treated to Reload Speed▲, which is broken for what it offers. For so long, Reload Speed buff has been considered one of the best buffs in-game, rivaling CDR. Why so? Because it is beginner-friendly, as it lowers the requirement of Max Ammo for most units and helps them achieve their fullest potential. Even Rapipi (Rapi: Red Hood) with 2-3× Max Ammo would still enjoy Reload Speed. Secondly, it helps with QoL. Having burst gen units always at max ammo after the end of every Full Burst helps a lot with rushing to the next FB quickly. Now, what makes the Maids' Reload Speed better than Crown's is that theirs can reach ≥110% together with Resilience, which means Perfect Reload/Infinite Ammo. Ever taste Alice shooting the whole battle without even reloading once? Yeah, that's what you can get.
In summary, Macho (Mast + Anchor) are incredible units. Their 40s B2 is no big deal as they are meant to be paired together (hint: it has never been since you can already use 40s B2 as off-burst). They are going to show presence in PvE content, especially in Solo Raid and Union Raid, and probably in Campaign and PvP as well (mostly Anchor). If we were to rate their impact, usability, and versatility, we would place them below Crown HelmTr and above Tia Naga on non-core, somewhere on the same level as Grave (or slightly above/below). Whereas Grave needs a good FLEX to perform, Maids are more like a plug-and-play.
Should I pull this unit?
A resounding YES if you are a competitive player in union or solo raids since they are the best buffers against non-core bosses. No questions asked, pull a copy at least. However, if you tend to lean towards the casual side, this duo can be skipped if you lack funds for EVA 2.0, depending on how good EVA 2.0 kits are. They are expensive in terms of investments because both want 10/10/10 (esp. for ≥110% Reload Speed), but they are like 2025's Bunnies — a revolutionary duo who saves Elysion from its demise (a movement led by Maiden: Ice Rose). They are also dupe-dependent as a large portion of their buffs are "caster's ATK". Thankfully, they can be obtained from Wishlist, use Supporter gear (abundant for most players), and are not reliant on OL quality (still want some Max Ammo, though, for burst gen purposes, albeit not always needed).
However, we understand that you may not have the gems to pull them. It would be a shame if you had to skip, but EVA 2 is coming up shortly, and perhaps they have better kits. Normally, we would advise waiting till EVA 2's skillsets are revealed, but we are not sure if there will be a filler event. Not only that, you will also not be able to use Maids in the next Solo Raid. Regardless of your decision, we truly hope they will entitle us to some Skill Reset(s) any day now.
Are they worth using Gold Mileage over? Yes, but we cannot say whether they are more valuable than EVA 2 units because we don’t know their kits. Take your own risk. Our general advice remains one pull and dip.
Kit Analysis
Mast: Romantic Maid is all about debuffing herself to buff her team, but she will overdo it and lose everything unless paired with Anchor: IM. This section will discuss her skills while also establishing connections to Anchor's effects.
Skill 1
■ Activates when entering Burst stage 1. Affects self.
Drunken: Hit Rate ▼ 20%, stacks up to 3 times continuously.
■ Activates only when in Drunken status. Affects all allies.
Critical Rate ▲ 20.05% continuously.
ATK ▲ 35.02% of caster's ATK continuously.
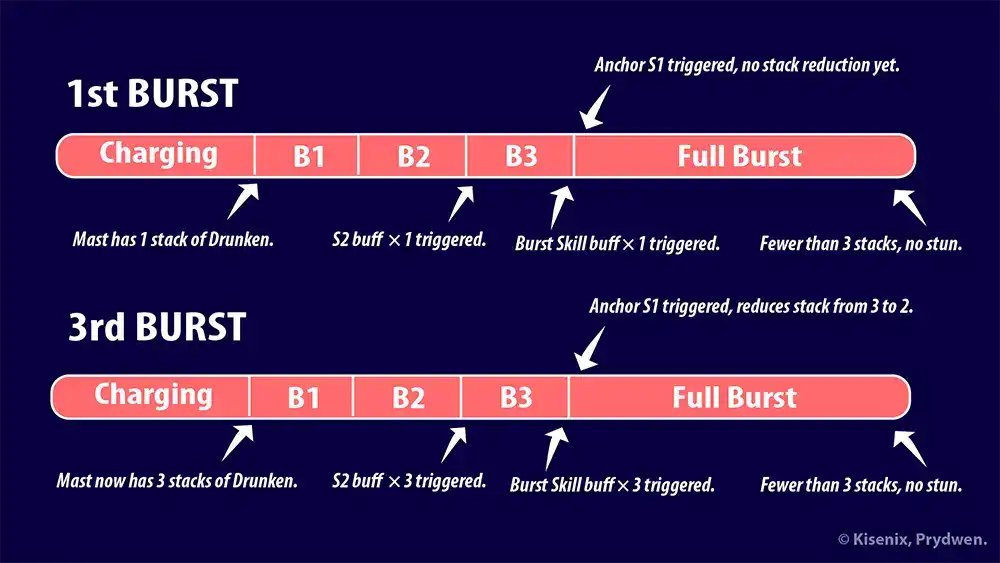
Mast: Romantic Maid gains a stack of the debuff Drunken upon the team entering Burst Stage 1. Drunken reduces her Hit Rate, causing her MG to shoot inaccurately, effectively turning it into suppression fire. It stacks up to 3 times, after which she will clear all stacks at the end of the following Full Burst and obtain the debuff Hangover, which stuns her for 10s. While stunned, she will be unable to shoot, reload, nor trigger Burst Skill.
MastRM can still accumulate Drunken stacks under Hangover.
As long as she has at least one Drunken stack, all allies benefit from increased ATK and Critical Rate. The strength of her S2 and Burst Skill also scale with the number of Drunken stacks she has. Therefore, it is advised that you avoid dispelling her debuff. Instead, try to maintain as many stacks as possible without triggering Hangover with the help of Anchor: IM.
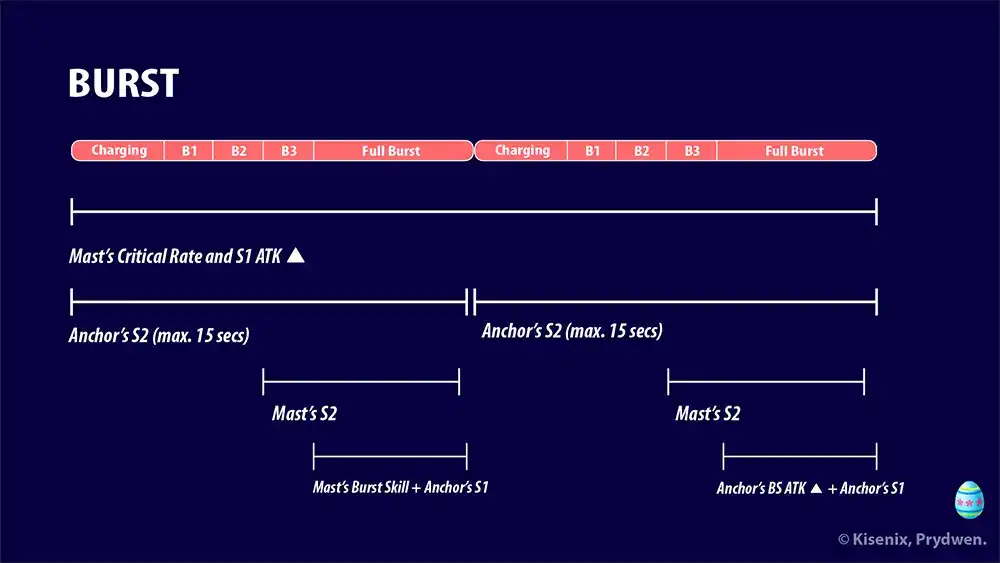
Anchor: IM can moderate the number of stacks Mast has thanks to her delayed debuff stack reduction mechanic. For Mast to be optimal, you want her to first obtain 3 stacks of Drunken before you intervene. Anchor: IM achieves this thanks to her "once, twice, three time(s)" mechanic that you can also see on Liter. Basically, the effects of her S1 will ramp up depending on how many times your team has entered Full Burst, and Anchor: IM will only start reducing stack after entering Full Burst for 3 times. Good stuff. Who let SU cook this time?

In an optimal team, you can consider Mast's S1 ATK and Critical Rate buff to be permanent as she will never lose her Drunken debuff. And no, there is no need to try to offset the Hit Rate▼ with OL, although no one's stopping you from doing that.
Skill 2
■ Activates when entering Burst stage 3 in Drunken status. Affects all allies.
Distributed Damage ▲ 15.03% * Number of Drunken stacks for 10 sec.
Reloading Speed ▲ 15.04% * Number of Drunken stacks for 10 sec.
■ Activates when the caster reaches max stacks of Drunken at the end of Full Burst. Affects self after the stacks are removed.
Hangover: Stun for 10 sec.
Upon entering Burst Stage 3, Mast: Romantic Maid provides the team with Distributed Damage▲ and Reload Speed▲ depending on the number of Drunken stacks she has. We highlighted how tremendous these are when combined with Anchor's in our summary, but let's dig a little deeper.
First of all, the Distributed Damage▲ is good for SBS. It acts as Damage Taken, and since it is a rare buff, it does not get diluted even. You can just say SBS’s Distributed Damage will rise by up to 45.09%.
Second of all, the Reload Speed. This one is mainly for ammo-sensitive units like Alice and Rapipi. Together with Crown or Anchor: IM, the total value of Reload Speed buff on teammates equipping Resilience 7+ can go above >88% and even >109%, enabling “infinite ammo”. Infinite ammo, also known as perfect reload, accelerates the reload speed of all weapons but mainly SR/RLs, which benefit from no ammo drop at all when the buffs are active. Infinite ammo can help Crown trigger S2 more often and provide QoL boosts by ensuring units have full magazines at the end of Full Burst, making charging burst gen easier.
As long as you can reach the next Full Burst within 15s of the previous Full Burst, you can assume that Anchor’s Reload Speed is permanent, therefore guaranteeing 10s of “infinite ammo” during Full Burst when Mast’s Reload Speed buff is also active.
Now, we can just ignore the 2nd part of this skill, which talks about the system of Hangover, but we talked about that already in Skill 1. In short, Hangover stuns MastRM, making her unable to use Burst Skill, fire/reload, contribute in burst gen, and other stuff. While stunned, she can still accumulate Drunken stacks.
!!! Don’t Pair Her With Random 40s B2s
Note that you cannot use MastRM with random 40s B2 without the stun affecting your rotation. This is because MastRM will stun herself at the end of 3rd and 6th Full Burst, and since one is odd and one is even, that means one of her rotations will clash with Hangover, regardless of whether you Burst with her first or second.
Burst Skill
■ Affects all allies.
Critical Damage ▲ 40.04% for 10 sec.
Attack Damage ▲ 15.04% for 10 sec.
■ Affects all allies if in Drunken status.
ATK ▲ (20.06% * Number of Drunken stacks) of caster's ATK for 10 sec.
Mast’s Burst Skill provides the team with a high amount of ATK▲, along with Critical Damage▲ and small ATK DMG▲. The Burst Skill is self-explanatory. Strong ATK buff that rivals Naga’s, Critical Damage▲ that synergizes well with her S1, and ATK DMG▲ that complements Mast’s and Anchor’s lack of ATK Damage Category Buffers. However, the cooldown is 40s, so you can only use it every other rotation. Besides that, it is also dependent on the number of Drunken stacks she has. One stack, it’s quite useless. Three stacks, and it goes stonks.
If you pair her with other 20s B2 buffers like Crown, for example, you need to test whether using Crown’s Burst or Mast’s Burst at a certain time/rotation/stack count will give the team more damage. It also depends on which B3 is Bursting that turn.
Usage Analysis and Tier List
Campaign (LD) - SS | Campaign (HD) - SS
Mast: Romantic Maid when run independently in Campaign can be used as an off-burst or occasional B2. She grants the team Distributed Damage▲, Reload Speed▲, and ATK▲, like Maxwell does. However, she is not really better than HelmTr or Naga that can continually activate Crown’s S2 or give Burst Gen. Besides, she needs to stack her buffs for maximum effect.
Maids when run together, however, are like Bunnies but in 2025. Their heals might be lower, but their offensive power is stronger. Another advantage of Macho is that their offensive power lasts till buffs end instead of just ending with the death of enemies (Blanc only “debuffs” current enemies, so if they are wiped and another batch shows up, you don’t have increased damage against them).
In Story/Tower pushing, most fights with constant rotation and CDR normally last around 5~6 Full Burst(s) depending on how fast you can fill your burst gen. Since Macho needs to stack, problems will show up when you need immediate power to handle enemies on the first or second Full Burst, because Macho won’t have full power during that time.
Bossing - SS
Macho is mainly made for Bossing — long battles that normally last 13~14 Full Burst(s) time — giving Mast and Anchor enough time to ramp up to their prime. They provide healing, which makes the team less ‘maldy’, and act pretty much like Bunnies 2.0. Our math tells us that as long as the boss doesn’t have a core, Macho will be the 2nd most effective buffer, best paired with strong Distributed Damage dealers like SBS and ammo-sensitive units like Alice.
Mast can still be used independently for bossing as a decent off-burst B2 tailored for Distributed Damage dealers. Like Maxwell, she provides the whole team with ATK▲ but additionally provides them with Distributed Damage▲ and Reload Speed▲, which can be beneficial for SBS & Alice. Against Anomaly Interception: Kraken, some players have reported an uptick in damage with Crown + MastM versus Crown + HelmTr, while some others the opposite.
PVP - B
As an MG, Mast automatically has a low rating in PVP as she suffers from extremely low burst gen and tendency to feed Jackal. The only redemption for Mast is her S1 — which is triggered the moment you have Full Burst bar but before Burst I is activated — granting B1 and B2 extra offensive power. This can open some interesting PVP comps, such as Rosanna + Mast: Romantic Maid.
Investments
Gear Investments
As a supporter, Mast doesn’t need specific OL lines. You still want to OL her gear for higher base stats (because her kit scales on caster’s ATK). Prioritize Helmet, Vest/Body, and Gloves. Boots are optional because they don’t give ATK stat, but the extra CP padding may be useful for Campaign or Tower.
1× Max Ammo will guarantee Mast never reloads outside Full Burst in slower comps (if manualed), but it is not technically needed. Hit Rate can help MastM land more core shots, but since she is not a primary damage dealer, it is hard to justify rerolling for it. We advise you keep whatever you get initially (T11s are good for CP padding) and don’t attempt to reroll.
- Essential:
- Ideal: 4× ELE, 4× ATK, 1× Max Ammo
- Passable: 3× Hit Rate
- Priority: Low
Skill Investments
Mast is obviously skill-dependent. Ideally, you want to 10/10/10 everything. But, if you don’t have mats, then Mast's S2 is the most important part of her skillset. It is what obtains her a spot in the meta. Focus on upgrading that first, and only care about S1 and Burst leveling for damage.
- Skill 1: 7~10
- Decent permanent crit rate and ATK buff.
- Skill 2: 9-10
- Prioritize this skill because it not only gives Distribute Damage buff for meta damage dealers like Scarlet: Black Shadow but also gives Reload Speed. For other weapons, you can settle at Lv 7+. However, for SBS and Alice, you want this skill to be minimum Lv 9 (with Lv 9 Anchor’s S2 too) to obtain “infinite ammo” through having >109% reload speed. Alice will literally never drop a single bullet in Full Burst (disclaimer: only with Resilience 7+)..
- Burst Skill:7~10
- A lot of ATK buff, Attack Damage, and Crit Damage, which synergize well with her Crit Rate buff on S1.
Suggested Progression Path
PVE investment
1/1/1 → 4/7/4 → 7/10/7 (→ 10/10/10)
PVP investment
1/1/1 → 4/1/1 → 7/1/1 (→ 10/1/1)
Priority
High
Cube Investments

For true “Infinite Ammo”, you will need Resilience 7+ and Anchor: IM or Crown.


Or, if you fancy, just slap a defensive cube on her (good idea for PvP, at least). You can even run her with any filler cube, and it’s fine. The higher the level, the better, because cube boosts base ATK stat.
Doll Investments
She is not worth too much doll investment because her own DPS is meh and MG Doll has one of the weakest weapon-specific effects. However, she scales off base ATK stat, and for all we know, dolls’ stats are undiscriminating. It gives the same base ATK stat boost to a Defender as it does to an Attacker. Hence, putting a leveled Doll on Mast can prove worthy due to the ubiquitous caster’s ATK buffs.
Depending on your competitiveness in Solo Raid, either SR 0 or SR 5 should be your end goal. SR 15 feels excessive even though you can justify it.
PvE Team Compositions
Team #1: El Macho Venciendo Kraken
Burst 2
Burst 1
Burst 3
Burst 3
Burst 2

A lot of players will have an easier time with Kraken once Macho duos are released. It’s because although Kraken has a core, SBS won’t have access to it half of the time, making Naga quite obsolete. In exchange, Mast will give SBS a huge Distributed Damage buff very early on, while preventing Alice losing Ammo too with the 109% reload speed. This comp is definitely the strongest Wind Weak comp, it doesn't matter if the boss has a core or not.
Team #2: Cingodrella
Burst 3
Burst 1
Burst 3
Burst 2
Burst 2
Electric funneling comp but with new variation featuring duo Macho. The fun part of this comp is that all ATK buffs are caster’s ATK, so it is not affected by Cindy’s lower base ATK stat. Hence, their buffs to Cinderella and XMaiden will remain as effective. Depending on the boss type, distance, and element, they may be able to compete with the popular Electric funneling comp, and you get more heals.
PvP Team Compositions
Rosy’s Revenge
Burst 3
Burst 2
Burst 1
Burst 2
Burst 1
This comp is 3 RL, but Rosanna will be buffed with Mast’s Crit Rate and ATK, which makes it easier to confirm kills with Burst. A variation of Scarlet - xAnne - Rosanna comp without healing/reviving.
Pros & Cons
Pros
- They did the deed, bond story 5, read it.
- Tia-Naga inverse, best duo with M.Anchor for non core bosses.
- Blanc-Noir 2.0 cuz of their insane heals.
- Cuteness overloaded.
- Doesn’t require specific OL lines to perform.
- Makes SBS great again after recent RRH and Cindy powercreeps.
- Makes Alice great again too.
- With Crown or AnchorIM, can exceed >109% reload speed for infinite ammo.
- A lot of caster’s ATK buffs which work equally well for Defenders as they do on Attackers.
- Distributed Damage▲ which functions as Damage Taken.
- Critical Rate▲ and Crit Damage▲ are good for bosses without core or attacks that cannot core-hit like skill damage.
- Gatrix, why so many pros?
Cons
- 10/10/10 supporter.
- Requires another 10/10/10 to Anchor as a pair to work.
- ATK▲ buffs are common and easily diluted.
- Buffs need to ramp up, limiting her power in short battles.
- Rips your wrist if you use Alice with her.
- A lot of caster’s ATK buffs make her very investment-dependent.
- Longest guide ever. Totally a scientific journal.
- Did you find the Easter Egg?