


Foreword
Previously, we explained how to OL, what each OL does, and provided a list of recommendations for each unit. However, how should I exactly arrange them on my gear? How do I use my rocks to get all of them on my gear? It is almost mathematically and financially impossible to be ridiculously lucky and acquire the perfect combination on each gear we have, but we can definitely try to reach near to that perfection. So, we have prepared several guidelines below that will help you minimise loss and obtain the best rolls in exchange for our finite quantity of resources, but it all still depends on your luck.
For more information, check our other guides in the Overload series:

Introduction
As before, we will separate our Overload Targets into three classifications: Essential, Ideal, and Passable.
- Essential: With all gear combined, your unit must have the roll(s) prescribed as a minimum requirement. Example: 2× Charge Speed on Alice.
- Ideal: These rolls will improve your unit's performance significantly. Aim for 2 lines of Essential/Ideal per gear for maximum performance and the best Return on Investment (ROI). If you get 3, you are lucky. You can choose to only have 1 as well to save materials. Example: Elemental Damage on Scarlet.
- Passable: Low-priority line that has either limited value or the impact is not as strong as other rolls. Should this show up as a bonus together with a better line, you can choose to keep them over other lines. Example: Charge Speed on Red Hood.
In a perfect world, we want our gear pieces to have at least 2 good rolls, where both belong to the Essential and/or Ideal groups. However, this is not a must as it is indeed more costly than having 1 good roll, which can be preferable in some situations, such as when the extra rolls are unnecessary or not that impactful, and you want to conserve rocks.
Before You Start
Before we go into Rerolling, there are few pieces of information we believe to be common knowledge about re-rolling.
#1. There are two types of Rerolling.
Change Effects
Using this option to Reroll changes the effects completely. Both Effects and Attributes are changed. To understand how to change effects, we have an example below.

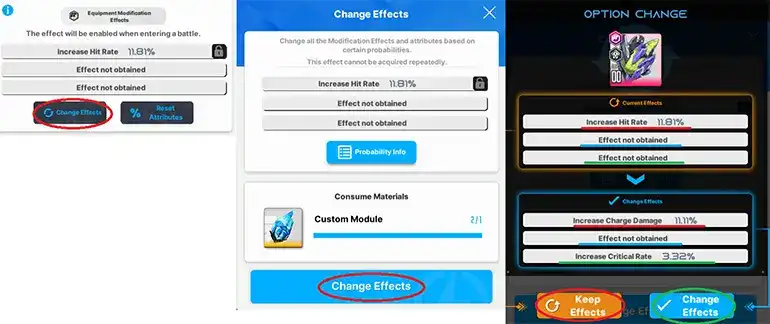
Here, we are Re-Rolling effects on B.Soda in order to get her to do more damage. We press Change Effects (Circled in Red in first two images) in order to change the effects we currently have.
Focusing on the right most image, in this case we had Line 1 Hit Rate (Red Underline above), which turned into 1 Charge Damage on Line 1 (Red Underline below). Line 3 (Green underline above) did not have an effect before, but now we have Critical Rate (Green Underline below) on Line 3. We see that Line 2 (Blue Underline) still did not give us new effects, since we were unlucky.
Now we face two choices. Keep (Circled in Red) or Change (Circled in Green) effects. Since Charge Damage is useless on Shotguns, we compare Critical Rate and Hit Rate for B.Soda. Both are considered as Passable effects for B.Soda, so now we compare tiers. Since Hit Rate is of a higher tier than Critical Rate, we will choose to Keep Effects! In cases where you get better effects, we would choose to Change Effects!
% Reset Attributes
Using this option to Reroll changes only the percentage (%) of the effects. The type of effect always remains unchanged, and a new effect does not appear if an effect has not been obtained in a line.
Example:

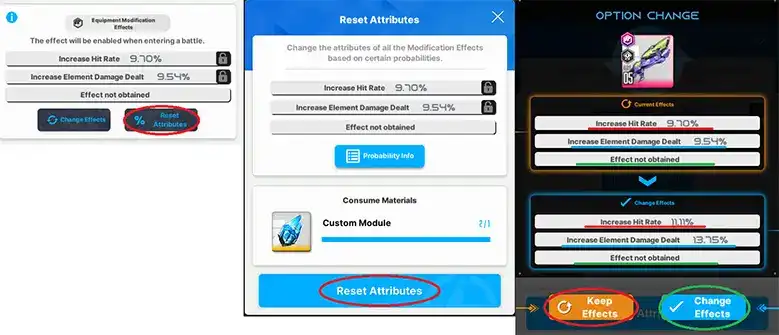
Here, we are Rerolling attributes on B.Soda in order to get her to do more damage. We press Reset Attributes (Circled in Red in first two images) in order to change the percentage (%) of the buff we currently have. Each effect has 15 Tiers of Attributes. The higher the tier, the higher the %.
Focusing on the right most image, in this case we had Line 1 Hit Rate (Red Underline above) with 9.70% (Tier 8 buff). The percentage upgrades to 11.11% (Tier 10 buff) (Red Underline below). Line 2 (Blue underline above) was a 9.54% (Tier 1) Elemental Damage before, but now we have a 13.75% (Tier 4) Elemental Damage line. We now see that not only did Line 3 (Green Underline) not give us new effects, but none of the other effects changed as well. Only the percentage (%) of the buff effects changed.
Now we face two choices. Keep (Circled in Red) or Change (Circled in Green) effects. Since both effects received an increase in percentage, we will choose to Change Effects! We would do the same if only Elemental Damage Tier had increased, but Hit Rate had decreased, since Elemental is an Ideal effect for B.Soda while Hit Rate is a Passable effect. In cases where you get lower percentages, you may choose to Keep Effects! We would also choose to Keep Effects if Hit Rate had increased, but Elemental Damage had decreased, since Elemental is an Ideal effect for B.Soda while Hit Rate is a Passable effect.
#2. Locking and Temporary Locking

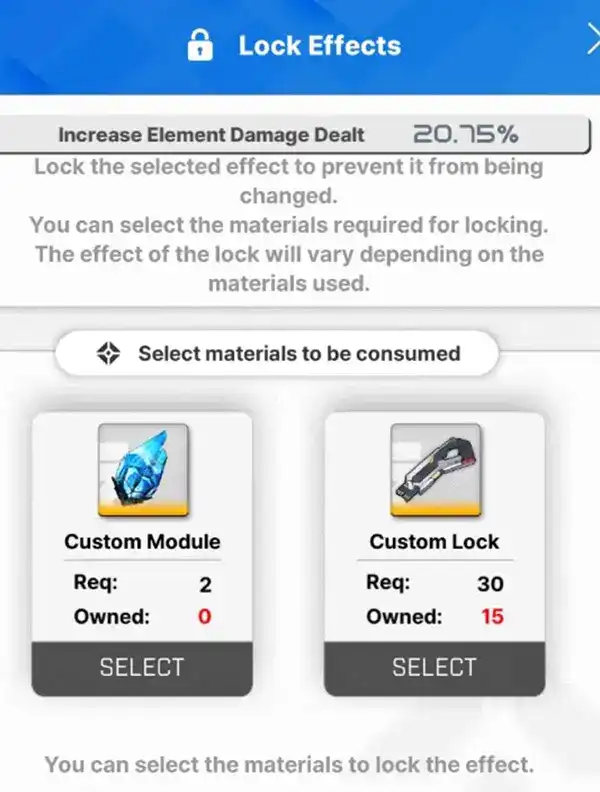
If you get a desired effect on an appropriate line, you can choose to lock this effect. This can be done in two ways. The first is by custom modules, which permanently lock the line until you unlock them, and the second is by temporary locks, which lock the line for 1 reroll.
Cost of rerolling increases with rerolling as follows:
| Action | Lines Locked | Custom Modules Cost | Custom Lock Cost |
|---|---|---|---|
| Reroll | 0 | 1 | - |
| Lock | 0 | 2 | 20 |
| Reroll | 1 | 2 | - |
| Lock | 1 | 3 | 30 |
| Reroll | 2 | 3 | - |
Custom locks basically allow you to save custom modules when rerolling. They are obtainable only after chapter 22, when you unlock Anomaly Interception.
#3. A Blue Text Line effect is a very high tier roll with a very low chance of appearing. These are Tier 12/13/14 rolls with high values.


#4. A Black Line effect is the highest tier roll of that effect. These are Tier 15 rolls, and are also extremely rare (1% chance of happening).


#5. Overload your units in this order to gain the highest ATK possible in case you do not have enough to OL all four gear pieces:
Head > Arm > Body > Leg
#6. In case the unit scales well with HP (e.g. 2B) or DEF (e.g. Mast) instead of ATK, the order of upgrading should be:
- HP: Body > Head > Leg > Arm
- DEF: Leg > Arm > Head > Body
#7. Reroll DPS before moving on to supports, unless the support has a Essential requirement (e.g 1× Max Ammo on D: Killer Wife, or making sure you reroll away any Max Ammo you have on your Dorothy).
#8. If a requirement is explicitly listed, such as in xLudmilla's case where Ammo needs to be 120%, the % of multiple rolls from all OL pieces needs to add up to that number.
#9. In cases where requirement is not listed, there is a minimum acceptable Attribute % value for each roll, which is usually considered to be what we count as 1× of the effect. If you have lower values than the ones listed, they can be considered to be 0.5× of the effect. Example: 2× Tier 1/2/3 Rolls of Max Ammo are what we consider as only 1× Max Ammo Roll on any unit. Here is what we consider minimum acceptable Attributes to be:
| Effect | Minimum Attribute (%) |
|---|---|
| Elemental Damage | 19.35% |
| Max Ammo | 52.50% |
| ATK | 9.70% |
| Charge Speed | 4.04% |
| Hit Rate | 9.70% |
| Charge Damage | Does not matter |
| Crit Rate | Does not matter |
| Crit Damage | Does not matter |
| DEF | Does not matter |
How to Reroll Efficiently
This is everyone's ultimate question. Even if we exactly know what to roll for our characters, our luck is not pristine. We need to make compromises. In this section, we will talk about, based on mathematical grounds, what is the most economical way to reroll your equipment so that you can achieve your intended result with the fewest resources possible. Should you lock your Essential/Ideal line? Should you refresh the attributes first? Be informed that, while our tips are theoretically accurate, your mileage may vary in the real world. After all, it is a luck based system.
For the sake of simplicity, we will be breaking down Re-Rolling into Categories and Situations which you may find yourselves in. Situations might have Follow Up questions which can give different ways of Re-Rolling. We will be discussing 3 categories of gear pieces. Each Category will have specific situations that you will always find yourself in, which will have answers on how to progress:
- Category 1: The gear piece needs 1 Essential or Ideal effect.
- Category 2: The gear piece needs 2 Essential and/or Ideal effects.
- Category 3: The gear piece needs 3 Essential and/or ideal effects.
Rerolling and it's Situations
Start rerolling with the worst piece. Knowing which gear piece to reroll is one of the most important steps to improving your Nikke's damage output.
- If the piece has no Essential or Ideal effects, that piece is the best choice to reroll on.
- If the piece happens to have one or more Essential/Ideal effects, refer to one of the situations explained below.
- If the piece already has all the desired effects, have one last check to see if they are below the minimum requirement.
Category 1: The gear piece needs 1 Essential or Ideal effect.

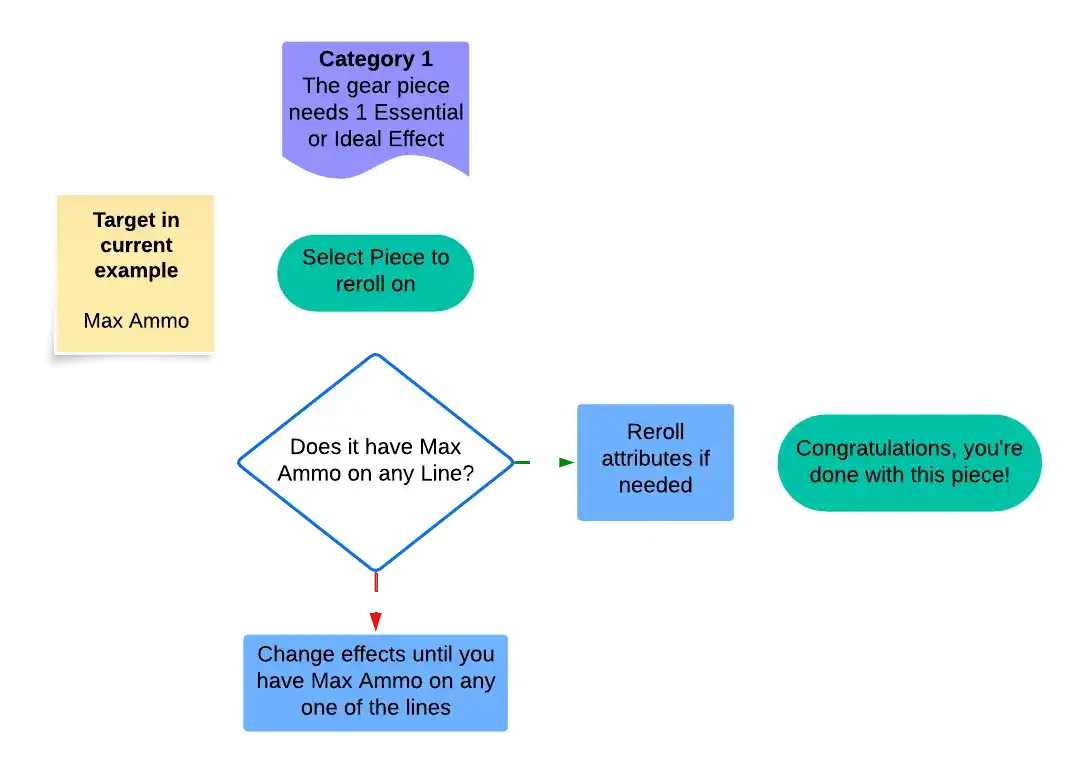
This category can be used when you are only targeting one Effect on a gear, such as if you want to make sure that a unit just has those essential rolls in order to make them usable units (e.g Max Ammo for Scarlet). Another reason to use this method of rerolling is when the unit only needs one specific effect, the example being as follows.
- Worked Example: D:Killer Wife
- Essential: Max Ammo (1×)
- Ideal: -
- Passable: -
TLDR: The best way to achieve 1 Essential/Ideal effect on a piece is to change effects, without locking, until you get the desired roll. Reset attributes if necessary.
- Picking the best gear to reroll on: There is only one possible situation in this case, which is that none of the 4 gears have a Max Ammo Capacity Effect on any of the lines. Pick one of the gears which preferably has no ATK, Elemental Damage, or Charge Speed lines. If all of the gears have one or two of these lines, then just pick any gear. Let's pick the head gear piece in this situation.
- Cost: 1 Custom Module per reroll.
- How to Reroll: The target for our gear is 1 Max Ammo Line. Do not lock any line. Change Effects until you get a Max Ammo line on any of the 3 lines of your head piece gear.
- Rerolling Attributes: After you have gotten that Max Ammo Line, your D should have 8 or more than 8 Ammo, hence there is no need to reroll her attributes. You are now done rerolling this gear piece.
In category 2 and category 3, you will see that a lot of times, it is recommended that whenever you get an effect on an appropriate line, reroll it's attributes until they have an appropriate value and lock it using custom modules. After chapter 22, we now have the option to use custom locks, a new feature added to the game. These custom locks can allow us to temporarily lock the lines, and reroll attributes of multiple lines collectively after we get multiple effects on the same gear piece.
Hence, you can choose to skip the "rerolling attributes" process until you get all effects on a piece first, provided you only use custom locks until you have all the desired effects. Only lock a piece using custom modules if it has an appropriate value, and it is on an appropriate line
Category 2: The gear piece needs 2 Essential and/or Ideal effects.

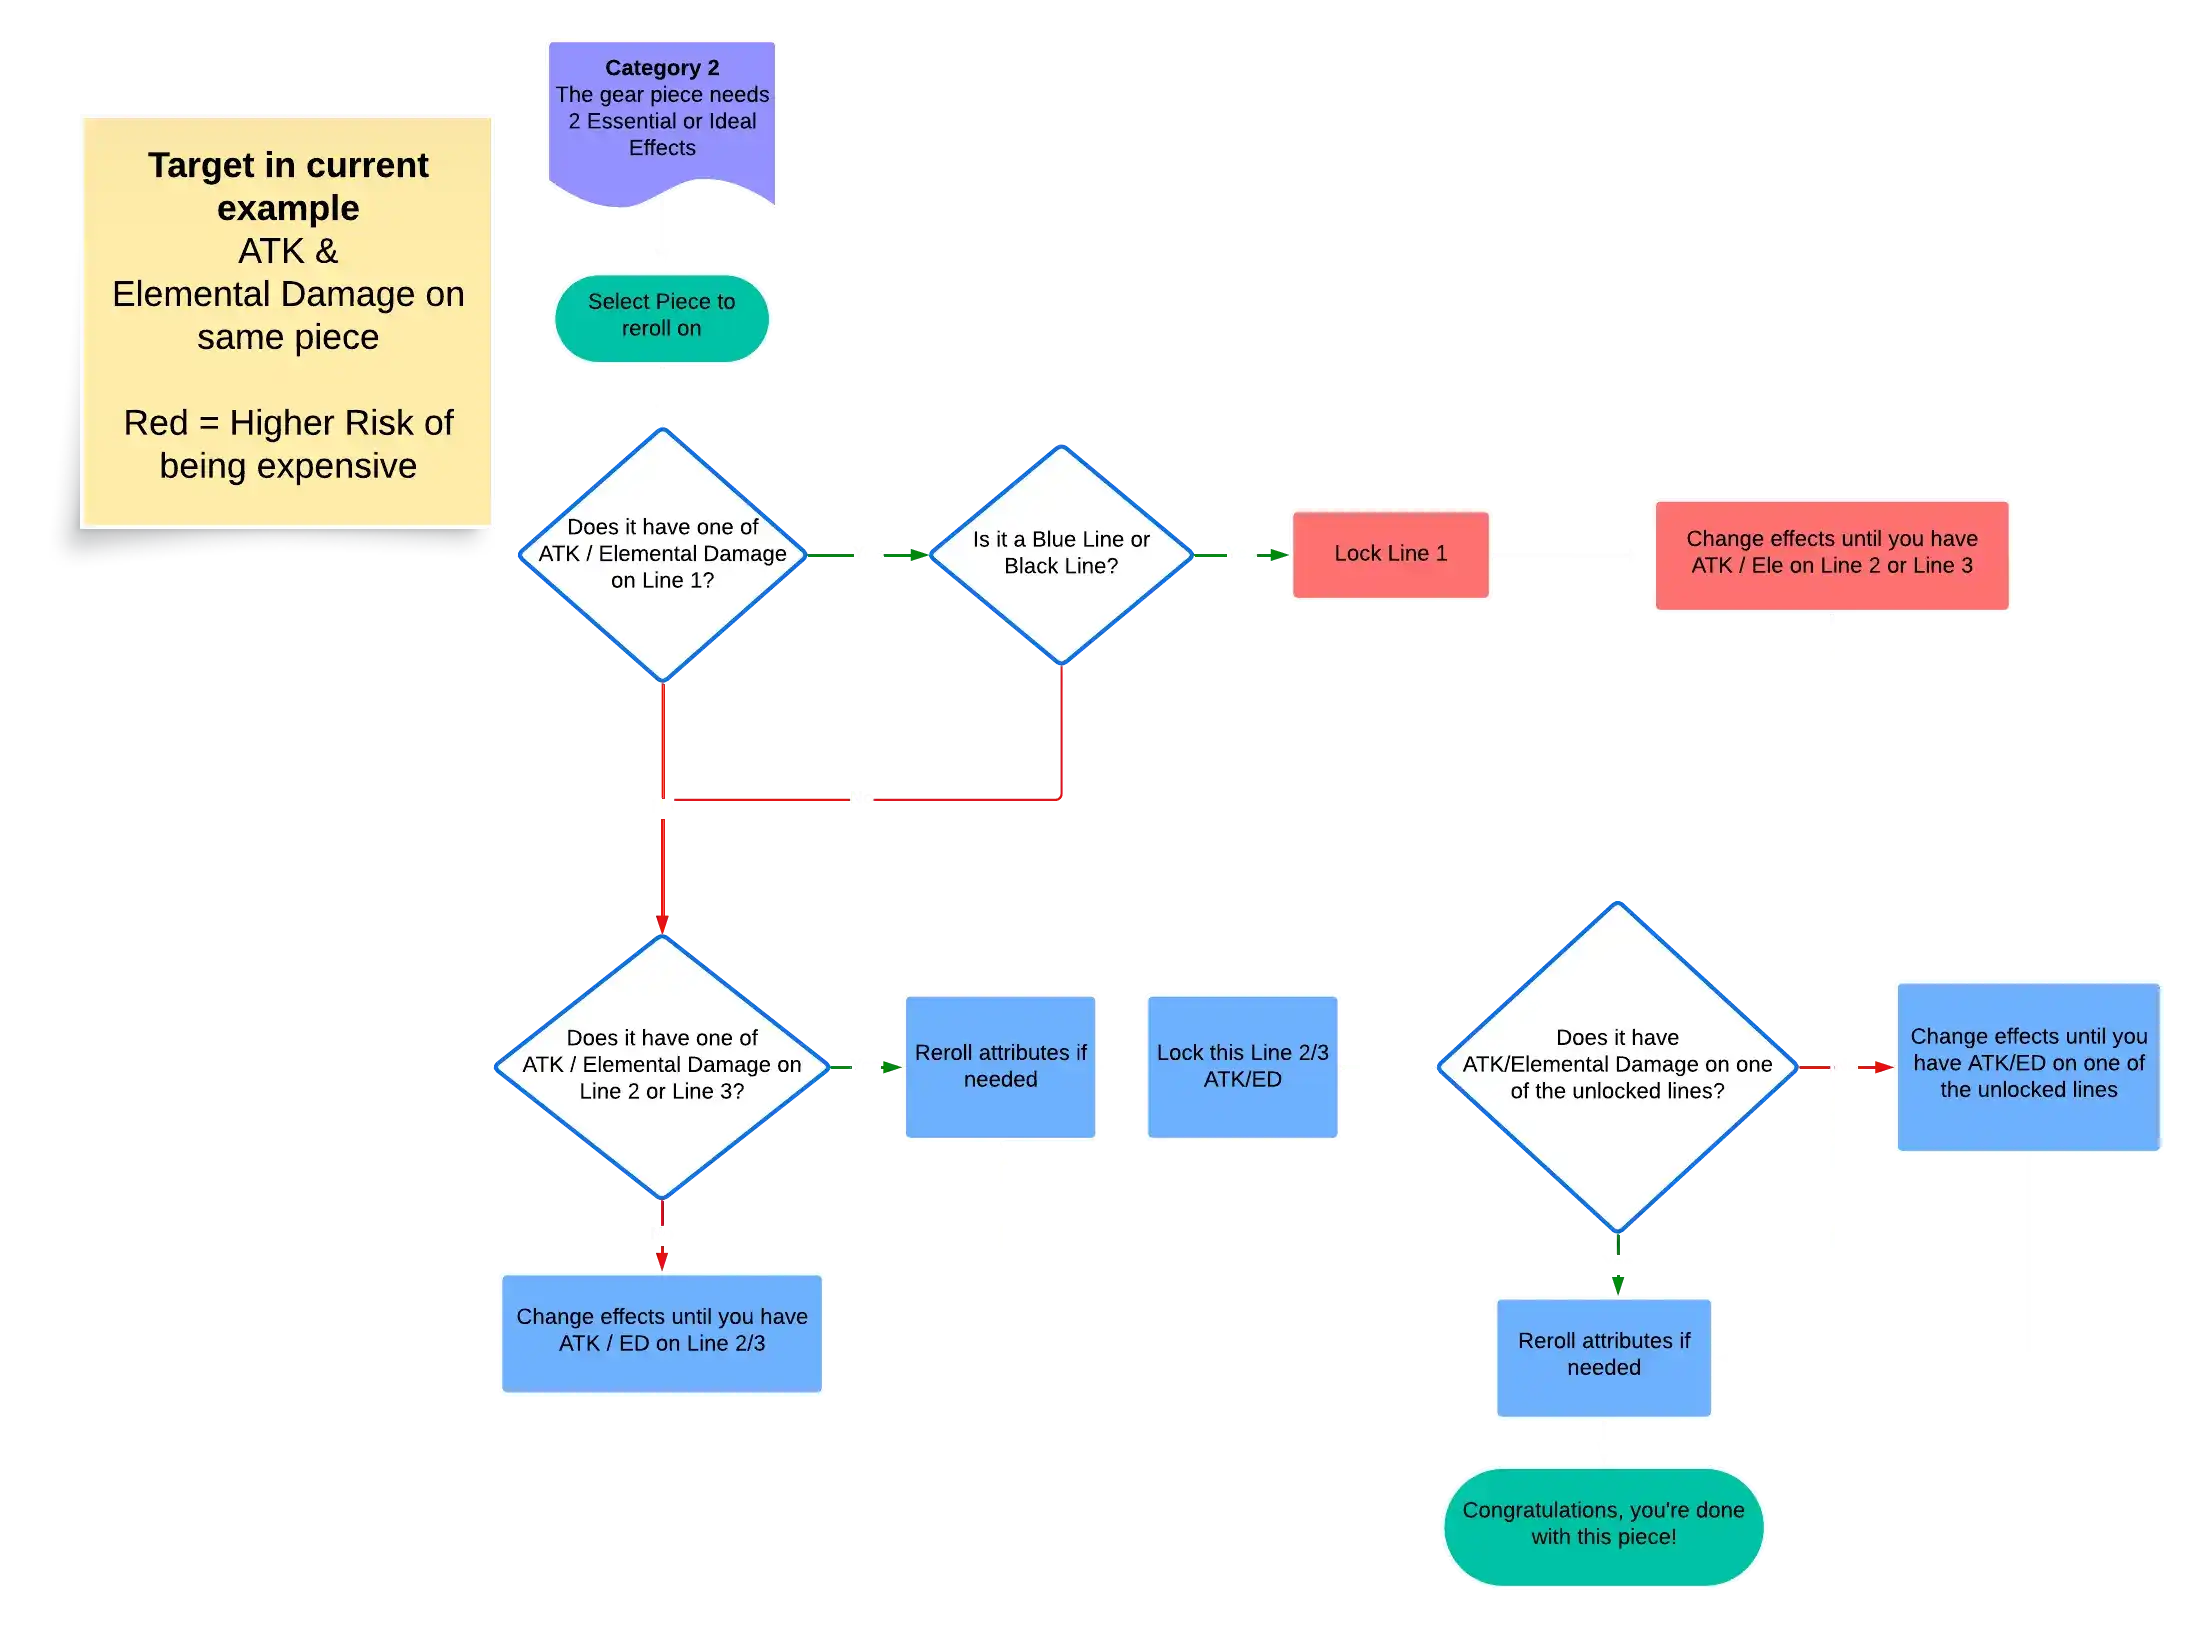
This category should be the most important category for most players, since having 2 good effects per gear is what most players aim for as a bare minimum. Even if the Nikke has a need of 3 Essential/Ideal effects per piece, having 2 of 3 important rolls is still absolutely fine in 90% of the situations, and is enough to compete for a top 1% spot in Solo Raids. It is the most cost effective method to build a Nikke.
- Worked Example: Snow White
- Essential: -
- Ideal: 4× Elemental Damage, 4× ATK
- Passable: 4× Crit Rate, 4× Crit Damage
TLDR: The best way to achieve 2 Essential/Ideal effects is to change effects, without locking, until you get one of the two effects on line 2 or line 3. Then Reset attributes if necessary. Then lock this line and change effects until you get the second desired effect on the other 2 lines. Reset attributes if necessary again.
Situation 1
I have none of the Ideal/Essential effects on my selected gear piece.
This is the best piece to reroll on since it has none of our desired effects and is the easiest and cheapest to improve. It is even better if the gear does not have any of the Passable lines, but even if all of them do, it is fine to reroll them away. Remember, Passable lines are supposed to be bonus lines, and not something to aim for, hence they can be ignored.
- How to reroll: The target for our gear is 1 Elemental Line and 1 ATK line. Do not lock any line. Change Effects till you have one of the Ideal effects (ATK or Elemental Damage). Then move on to situation 2.
- Cost: 1 Custom Module per Reroll.
Situation 2
I have one of the Ideal/Essential effects on my selected gear piece.
Follow up 1: Is it on line 2 or line 3?
This is the second best piece to reroll on since it is considered cheaper than other pieces, and is faster to finish statistically.
- How to reroll: The target for our gear is 1 Elemental Line and 1 ATK line. In this case, let's assume we have an Elemental Line on line 2 or line 3, and now want to get an ATK line on the same piece. First, ensure that this Elemental damage line is above the minimum requirement of attributes %. If it is not, Reset Attributes until it is above the requirement. If it is above the minimum % needed, we will now LOCK the line with the ELEMENTAL DAMAGE effect. Now, we will Change Effects until we get ATK on any one of the other 2 lines. After getting the ATK line, we will move on to Rerolling Attributes again until ATK is above or equal to the minimum Attribute %.
- Cost: 2 Custom Modules per Reroll.
Follow up 2: Is it on line 1?
This is the third best piece to reroll on since it is considered more expensive than other pieces, and takes longer to finish statistically.
- How to reroll: There are two ways to reroll this piece, both have their advantages and disadvantages. We will be going through both of them here:
- The effect in line 1 is of lower value than a Tier 11 roll:
- The Target for our gear is 1 Elemental Line and 1 ATK line. Do not lock any line. Change Effects till you have one of the Ideal effects (ATK or Elemental Damage) on Line 2 or Line 3. Then move up to Situation 1.
- Cost: 1 Custom Module per Reroll.
- The effect in line 1 is a Blue line or Black Line:
- In this case, you can opt to go down another path. While the above mentioned method of rerolling is statistically the best and safest option, getting a blue line or black line is extremely rare and is of high value. The alternative is as follows. We want to LOCK that effect in Line 1. Let's assume we get a Tier 13 Elemental Damage on Line 1 (26.36%). After Locking, we will now Change Effects until we get ATK on either line 2 or 3. Now, if the ATK roll is below the minimum acceptable attribute, we will Reset Attributes until the ATK line is above the minimum acceptable percentage (%).
- Cost: Each Reroll costs 2 Custom Modules, so keep in mind that this method poses a higher risk. However, if you happen to strike good luck, then this method is a higher reward.
Rerolling Attributes
If you happen to luck out and get both of the Essential/Ideal effects on your piece from a random reroll, now is the time to reroll your attributes. Check if any of the effects are below the minimum acceptable attribute %, and Reset Attributes until you have at least one of them above that minimum %. If one of the rolls has reached the desired % but the other has not, lock the effect that has reached the desired %, and Reset Attributes until the other effect reaches the minimum acceptable %. You are now done with rerolling this piece and are ready to move on to another one. Congratulations!
Category 3: The gear piece needs 3 Essential and/or Ideal effects.

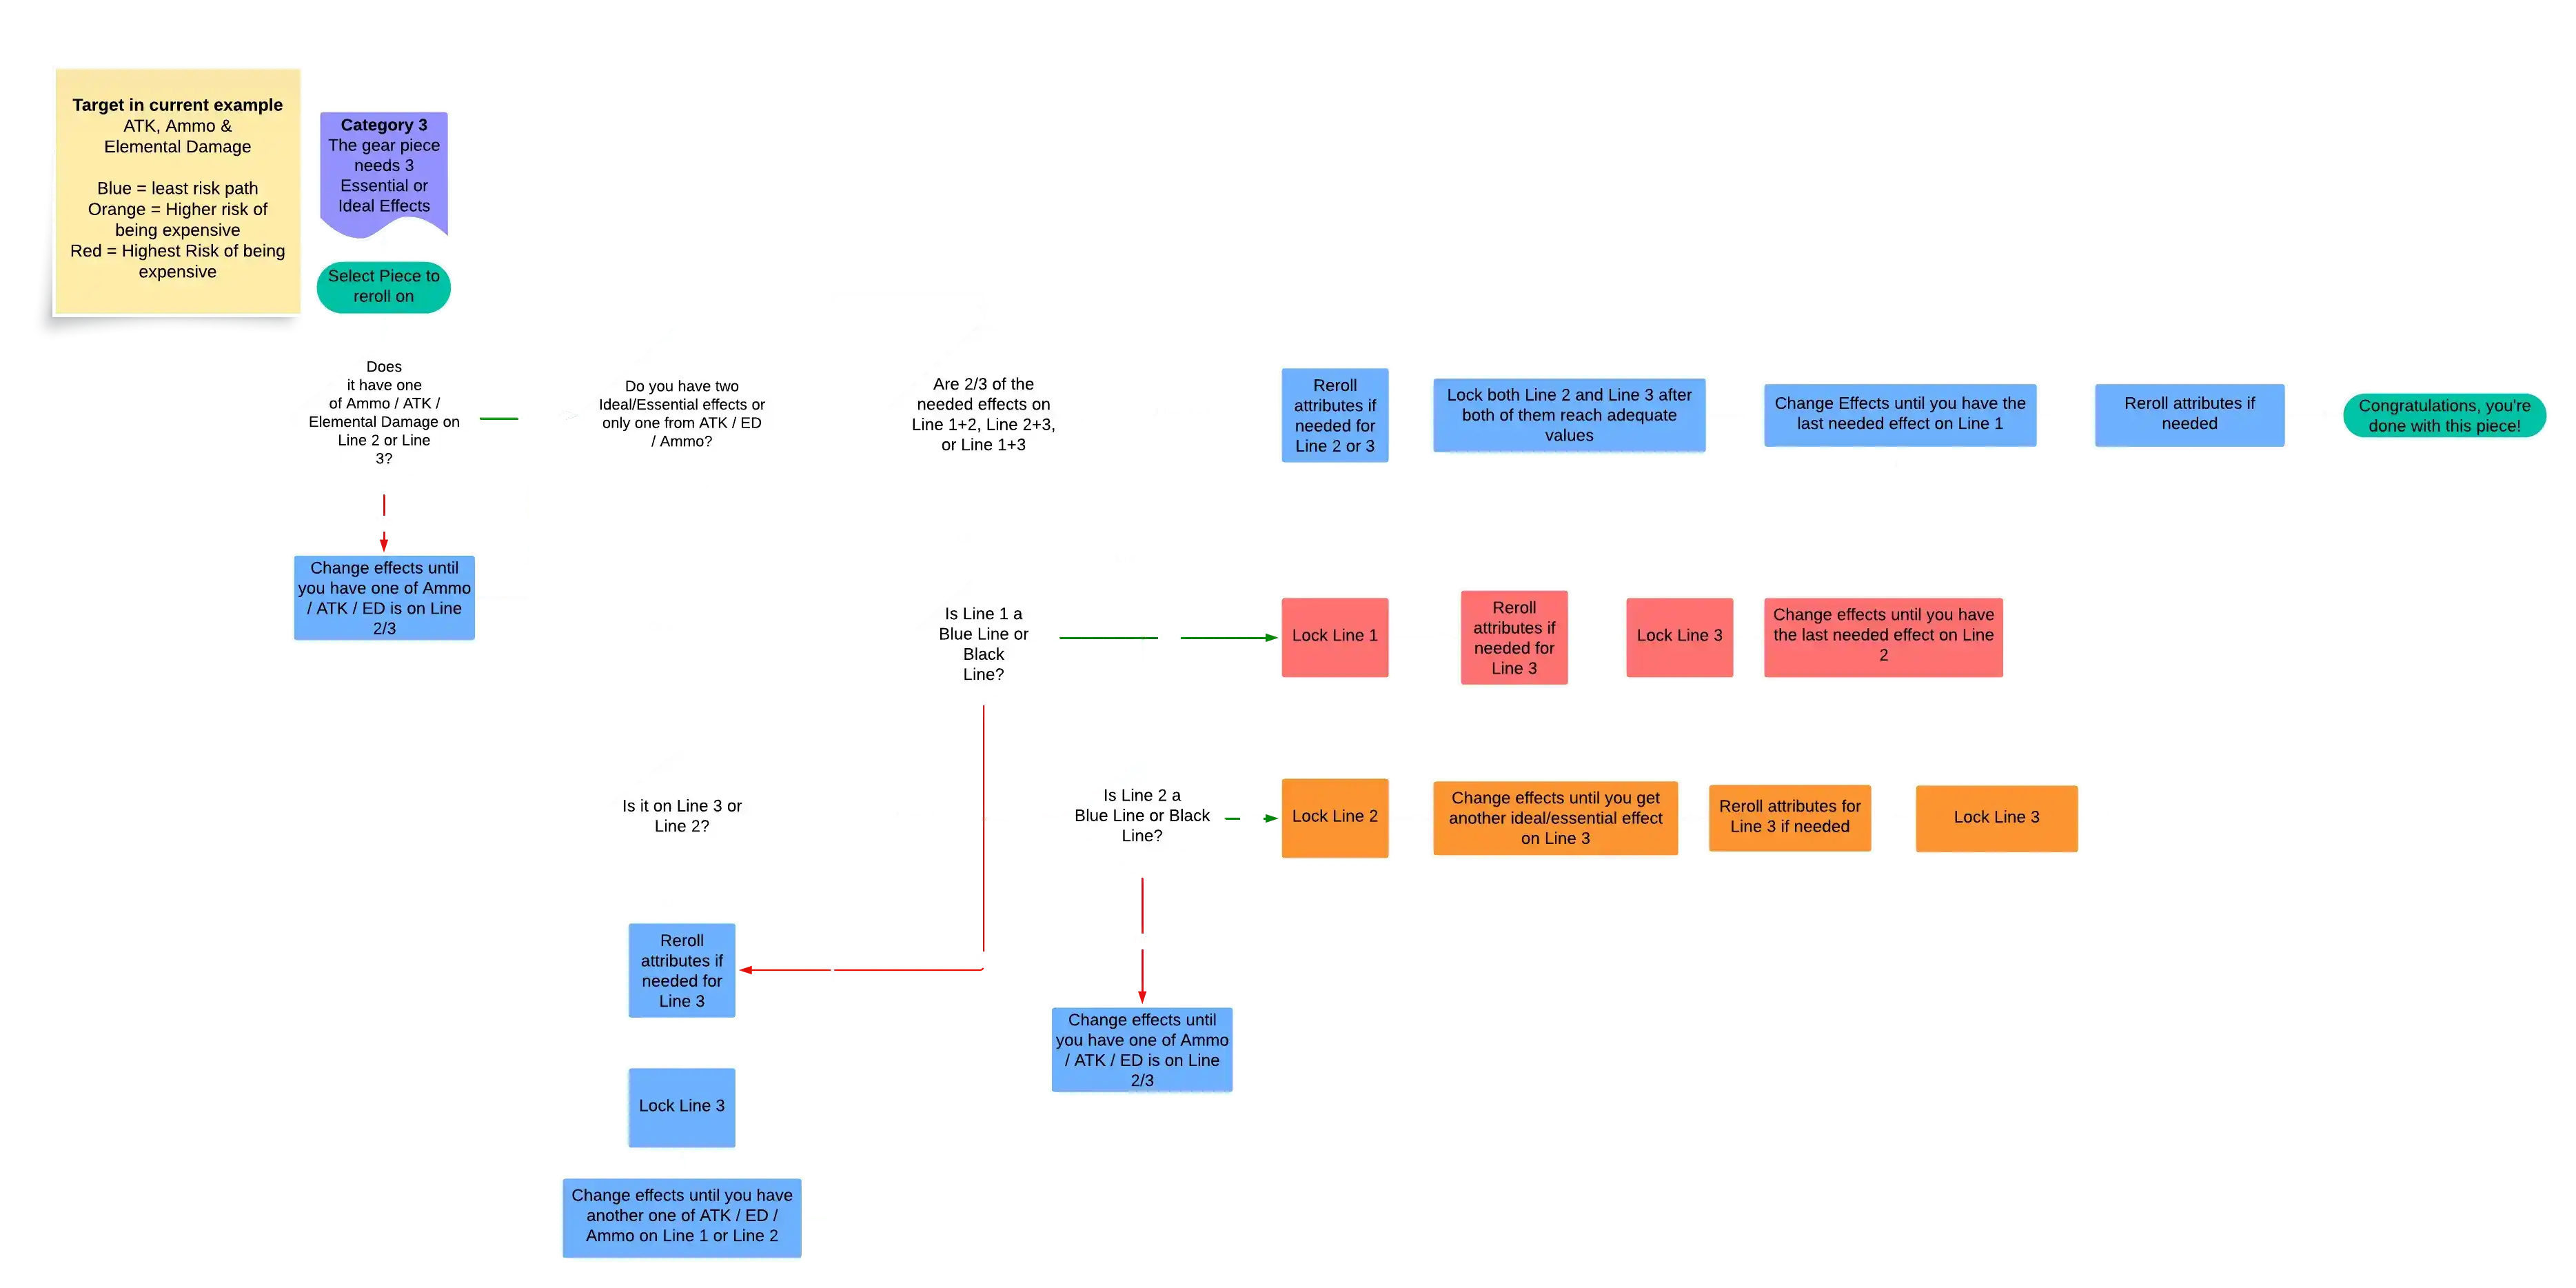
This category is mostly for competitive players who aim for the best of the best rolls, or for those who want to see their waifus reach perfection. These methods of rerolling can be extremely expensive for players, depending on their luck. However, the final result can definitely be worth the expense, since the unit maximises their potential.
Rerolling Principles (Hygiene)
Now that you've understood how to reroll efficiently, there are two more principles that we'd like you to know:
- Mass Rerolling: Rerolls are better done in a batch. This is because sometimes when swapping from one configuration to another, you may have to take a ‘transitional’ weaker state. For example, if you have ELE X X on Rapi: Red Hood then get X X ATK when rerolling it, the second configuration should be taken because it allows for more cheaper 2-3 Line Setup in the long run. However, it is temporarily weaker than the first configuration, so ideally you want to "avoid this transition" by continuously rerolling till you get to a state better than the original. The only way you can do this is if you've saved a lot of rocks, right? Note that, if your configurations have a forward progression (no transitional phase), you don't need to save, but it's still a good thing to do, so you don't get caught off guard by a good unit release with 0 rock.
- Dependent Rerolling: The desired number of lines is sourced from four gear and not only one, which means rerolls for all should ideally be performed together. For example, say you have 4 gear for Alice: ATK X X, ELE X ATK, ELE CS Ammo, and Ammo ELE ATK, and you need 1 more CS. Which gear should you reroll? The most ideal choice is the first one because it only has Line 1—and you might get Charge Speed randomly. Say you instead get ATK Ammo ELE and are still missing CS. Which should you reroll next? The second gear! There is an empty line, so let's try to fill that in. Oh no, you got Ammo instead! You still need CS. Which gear should you reroll next? The fourth gear! Because the Ammo is in Line 1, it is the cheapest to replace. Note that this is just one simple example. In the real world, the values/percentages of the lines are also taken into account.
Ultimately, our goal is to spend the least number of rocks for our desired number of lines. Not adopting these two principles can cost you value in the present or even the future if it snowballs. In the worst case, it can also increase the number of rocks you spend, resulting in a less economic cost:result ratio.
Final words
Rerolling is a luck based system, and due to the poor rock income from Special Interception, some bad rng can leave the player in bitter taste. Be mindful of where you use your rocks since not only is there a lack of income, there are also a lot of meta units now which we have to reroll on. Regardless, this system has now been in Nikke for quite some time now and it is about time we released a guide on it. With the new CP system in place, rerolling for more effects is also more critical since we want our campaign and PvP Nikkes to be stacked with Overload lines to take full advantage of this new system. I hope you found our guide helpful. Feel free to join us at Prydwen Discord server to discuss any improvements, give feedback or get direct help from us at Prydwen and their Nikke Community!