


The Workshop of Brilliant Light is a brand new game mode which drops the newest and highest level artifacts. As of now, only the easy and normal modes are released, and they respectively feature level 73 Epic and level 78 Legendary artifacts with 3 brand-new sets. Don't let the names of the two difficulties fool you as even on easy the game mode can prove to be a challenge!
New Game Mode, New Gear
Here's a quick, illustrated overview of the new artifacts introduced, their expected potential and a comparison between the new and the old artifacts.

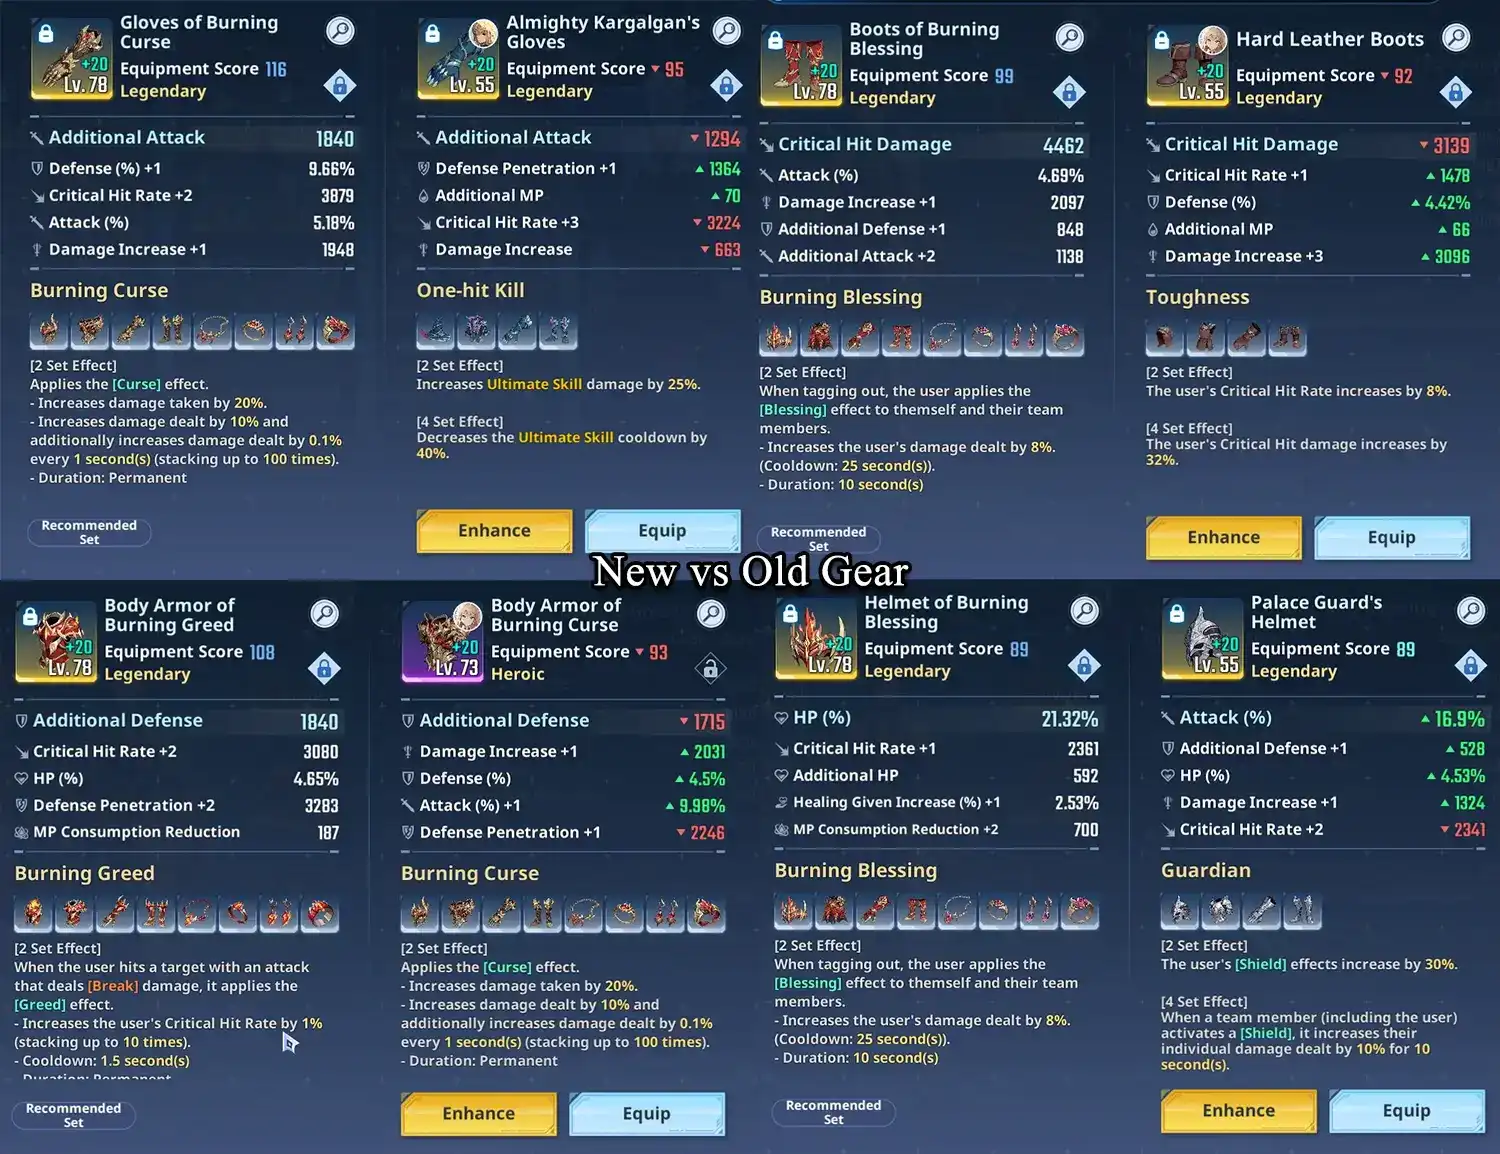
It's pretty clear that any good to great level 73 and above artifact will outshine the old level 55 artifact when at similar upgrade levels anywhere between 20% for the Main Stats in percentages to about 30% for the Main Stats with flat values. The same applies to the substats, where you can consider as a general rule that every upgrade on flat "special" stats (Crit damage, Defense penetration, etc...) for the new artifacts equals close to two upgrades for the Classic artifacts. The difference is once again toned down for percentages, but remains noticeable nonetheless. When it comes to Crit damage boots and Elemental damage bracelets, expect about 25-30% increase in the main stat for Legendary artifacts, and closer to 20-25% for Epic rarity.
The difference between Epic and Legendary Vulcan artifacts is much smaller than between the Classic artifacts and the new Epics, so it will be better to secure as many artifacts as you can, rather than focus on few, higher quality Legendary drops.
As for the set effects, every new set at 2 pieces is better than the sets in the left slots with the same amount of pieces. This is especially true for longer fights, as most of the new sets require ramp up to truly shine.
When it comes to 4 piece effects, the Greed set is the clear winner, turning your breaker into a potent supporter! The Blessing set and Curse sets effects are somewhat lacking, however, as they mostly improve survivability in a game where DPS is king. Remember that the Blessing set can only apply when using supports for Jinwoo at 4 pieces and above, in which case using it on the right side slots alongside Classic support sets on the left slots is a strict improvement.
For the 8 piece effects, as it is difficult to obtain and upgrade those sets as of now, it is supposed that every Vulcan set with proper main and substats will eclipse every other combo of level 55 sets, especially for any character not relying on the attack stat to deal damage. There is consideration for the use of 3 sets at once, notably for attack based characters and supporters in attack based teams featuring 2 Curse, 4 Expert and another 2 piece set that perhaps keep up in some content (especially with poor Vulcan sets stat wise), but until proper testing is done do not salvage your mediocre Vulcan gear.
Which Difficulty to tackle?
According to the loot table shared by Netmarble in their patch notes, the maximum number of artifacts you can drop on easy is 13, with no chance of getting Legendaries. On the other hand, you can get up to 26 artifacts by fully completing normal mode, 6 if you clear only Cerberus and 12 if you stop after floor 25 with a good chance to drop Legendaries on every fight. That's why we recommend only to tackle normal difficulty if you can clear at least floor 25, as trading one drop for chances at Legendary gear is worth it. Note that clearing Normal Vulcan with Jinwoo will yield the most items out of any fights, so even if you're unable to clear the hunter side afterward, you'll have already obtained most of the rewards.


Blessing Discussion
Jinwoo side
The clear, uncontested winner is the Ultimate damage increase. The reason being how the buffs interact with each other, for example having two Crit damage buffers on top of plenty of Crit damage blessings would be less efficient than a more even spread of various buffs/debuffs. That's where Ultimate damage sets itself apart, as it is very uncommon to run such buff with Jinwoo's set, abilities or support, on top of having amazing base damage at Skill level 7 and above. The other offensive options are all more or less viable when they come paired with Ultimate damage, so don't be afraid to test things out and see what fits your team the best. However, avoid the triple stat buff and all the Non-Offensive blessings.
Hunters side
Alicia will benefit the most from Core attack damage, as it scales extremely high. The higher your investment on Alicia the more benefits you'll get from this blessing. Alternatives will be Ultimate damage if you're playing double DPS, Damage Taken Increased or (high rarity) Health Reduction, and a blend of Crit Damage, Attack or Defense Reduction if your power isn't so low that your Crit Rate is set to the bare minimum. You may consider a Legendary Crit Rate node if Crit Damage is a vital component of your build.
Fights Breakdown and Team Building Tips
In this section we'll go in-depth to better understand the fights, which abilities are required and who fits the bill, always keeping in mind that lower total power (TP) means lower stats, thus more need for all the roles to be fulfilled.
In general, you will want a Breaker for every main stage of the dungeon, as the monsters all possess a varying degree of damage reduction or special, heavy hitting nukes when unbroken.
It is also important to understand how the Freeze mechanic works, as it will make encounters easier by "pausing" the enemies and slowing them from moving to new phases. After being Frozen for a cumulative total of 4 seconds, bosses will always break off the Freeze and obtain an Immunity to it lasting 20 sec.
Cerberus
Everyone's favorite good boy is back again, bigger and meaner than ever. As the entry level fight, Cerberus sets the tone: you will need to stay on your toes, and the farther you go into the fight the more punishing the mechanics become.
There is not much to say about him, the base mechanics of Cerberus are still there but he gains a few unique abilities on top like the Tornado + Meteors and the rotating Laser Beams at certain thresholds. If the timer isn't an issue, simply focus on dodging during those very high damage phases, as tanking these attacks even for a brief moment could severely injure you or result in a game over.
Floor 25
For many, this will be the first real wall you will encounter. It is highly advised to use a Breaker, as it stops the first boss from becoming untouchable for a time (Hard Control functions similarly) and stops the unavoidable nukes from Bosses 2 and 4, while increasing your overall damage output. Bosses 3 and 4 are Invulnerable to damage while gaining their Elemental Damage Reduction buffs, so pay attention to avoid wasting your skills. Aside from that, fights here are DPS checks, so either bring two strong DPS or a very strong DPS + Support.
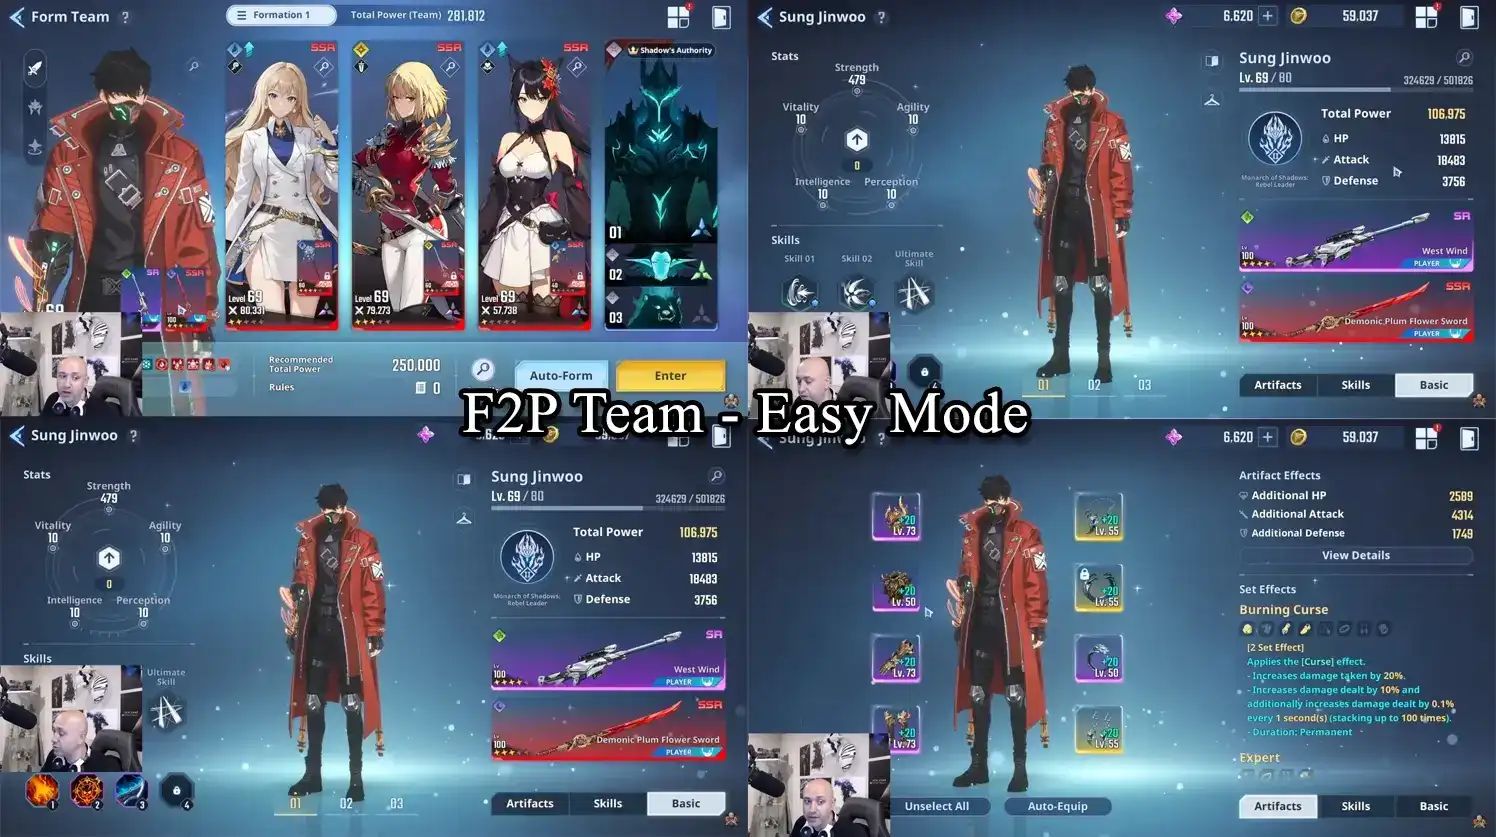
Here you have a team that cleared it on Easy mode, full F2P:
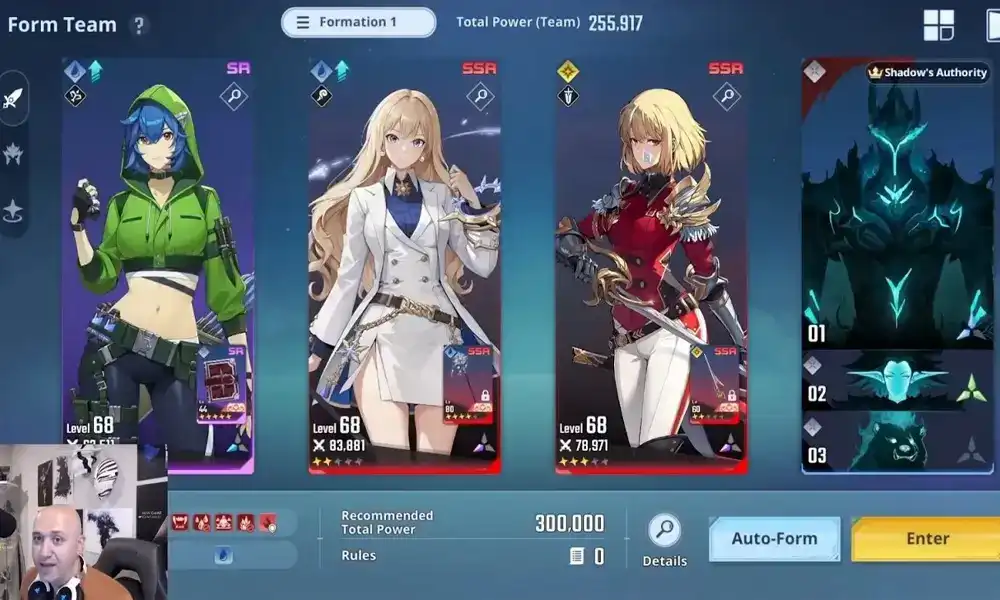
Video showcase of that team, from content creator Payneblade:
Vulcan Jinwoo side
Here comes the big guy, ready to get revenge on all players who defeated him during the story. Vulcan features extremely high health, a shield, powerful nukes, DoTs and a stage Burn effect that will at 5 stacks deal large damage to your team and Stun you for a few seconds.
The boss will prove to be a challenge and even getting above the red total power (TP) threshold won't guarantee that you can beat this massive demon. Let’s see the mechanics behind the fight next
- The good thing is that the entire moveset of Vulcan is scripted, meaning that he will always use his attacks in the same order and the only time he will skip them is when you push into a new phase. Note that he will always finish his current move even if you push him into a new phase (like when he'd disappear from the stage).
- As such, using massive nukes such as your ult with full support or a fully buffed rotation during a Freeze right before the phase change can give you a not so trivial boost when you do it 2 or even 3 times throughout the fight.
- Damage wise, Breaking him will be your first priority as he benefits from a very high Damage Reduction while unbroken. The second priority will be to maintain your Shadow Step's Defense Shred as often as possible, especially before using your big skills and nuke rotations.
- Said phase changes are:
- 1st is at 100/110 Health bars on Easy/Normal.
- About 55/64 Health bars for the second one.
- Shield appears at about 20/24-25 Health bars once again depending on Easy/Normal so use Meilin/Dongsoo carefully in the last phase.
- You might run out of Mana multiple times throughout the fight, so make sure to always spam your Basic Attacks when he leaves the stage and prepares his massive nuke (if you're confident, you can also do it while standing in the safe zones to refill even more).
- Lastly, while your Shadows will deal very little damage to him, they can be used to divert his attention to give you more space to land your heavy hitting abilities, so use them carefully as it can also make it harder to dodge for the Shadow Step.
Let us now review Key Abilities to build a reliable team for this Boss
- The Shield You will need a way around Vulcan's most terrifying ability: his Shield. While not strictly mandatory as it is technically possible to finish the last 20 or so Health bars in a single, hyper boosted Ultimate, this is not realistic for the vast majority of the player base.
- Failure to Break the Shield will result in an enormous nuke that will likely send you directly to the game over screen, but even if you do manage to Break it by dealing damage, the time spent will turn an already difficult fight into an almost impossible challenge.
- As such, Meilin or Dongsoo are necessary, with Meilin being overall better as she also gives a very valuable Attack boost on call.
- The Stage Burn A Cleanse will also be required, as the stage effect will inflict heavy damage on top of a fairly long Stun that will make you a sitting duck for Vulcan's swings.
- Alicia or, to a much lesser extent Park Heejin, will be required. Once again, the water character is favored, as her buffs are less situational and she covers many areas with a single button press.
- More damage As punishing as they are, Vulcan's attacks are never the biggest problem, the timer is. A perfect run can still lead to a failure, as the monstrous Health pool of the Boss will stop many players in their tracks, in both Easy and Normal difficulties.
- For that reason, Supporters like Min, Lee Bora, Cha and Silver Mane Baek (if lacking Meilin) are encouraged.
- Avoid picking two Attack Buffers or two Damage Taken Increased Debuffers at once to limit the stacking of identical buffs.
- What about Break? Worry not, Jinwoo was born with two Skill slots, and it's time to put them to good use! While you can use an extra Breaker instead of more damage, Jinwoo has access to powerful water abilities, such as the Rush Multistrike and the Iceberg Armor Break. If one of those is unavailable, try using the Death Dance runes even if sub-optimal.
- If you insist on bringing Breakers, Nam, Seo and Baek all are great options, you could even consider Kim Sangshik who features a heavy Break support skill, although he would not bring anything else to the fight after a minute or so.
Here are a couple of videos and pics showcasing the fight on both Easy and Normal modes, at varying Total Power and with or without a Water weapon:
- Easy mode full F2P run with about 280k TP by youtuber Payneblade

- Normal mode run at about 340-350k TP, pre-global buffs, Grimoire A5
- Here are a few examples of teams that managed to clear Vulcan Normal at different levels of Power - some before, some after the global buff.
Beware High Investment required! Top two pictures are similar to the video linked, with a couple blessings differing (Reawakening replaced by Double-Edged Sword).


Vulcan Hunter side (Normal Mode Exclusive)
As its name implies, the goal will be to defeat the same big baddie, except without Jinwoo. That means no Shadow Step, no Basic Attacks to Regen Mana and no broken Ultimates. The key to this fight will be the characters, as for those lucky enough to own the right hunters the fight might feel way easier than Jinwoo's side, and yet for those without enough damage very little will be available to bridge that gap.
- Highly invested A3/A5 Alicia, A1/A2/A3 Meilin and your best Breaker/DPS Hybrid Seo (High Investment preferred, sky's the limit) will be key to tackle this fight without suffering from severe hair loss or waiting weeks and potentially months for your total power to increase.
- The strategy will be simple: whatever best long fight set combo you can afford (typically what you'd put on Jinwoo) you're gonna put it on Alicia, get as many buffs for her as you can from Meilin and her gear, then Seo will take care of Breaking and adding a non negligible amount of damage herself. Also consider a well geared, 4 Blessing/4 Greed or 8 Greed Nam, with a Noble Sacrifice/Guardian/Destroyer + Connection Meilin, although this might not be enough to compensate the loss of Seo's personal DPS this would further amp your Alicia's damage to the moon!
- If you have good pieces of the new sets now is the time to use them: 4/8 Greed for Seo ideally with the Greed pieces on the right slots to keep the Break set if only 4 Greed pieces, 2/4 Left side slots Blessing for Meilin (or whatever pure Support set works best for you) and a 2 Curse + 4 Expert + Tough/Armed/whatever's got the best stats can work wonders on Alicia, unless you own a correct, full 8 piece Curse set.
- You'll be going through your entire team constantly to reapply Meilin's stackable buffs, Alicia will use her entire rotation and Ultimate on cd or right before the phase changes to stack the Expert set and whittle down the boss even if he isn't broken as you gotta work on those Expert set stacks, and Seo will spam her skills to Break quickly while still swapping frequently whenever you believe your cds are up for Meilin.
During the inter-phases with the Safe Zones swap back to Meilin, use her Core attack and stacking ability to keep the buffs maximized and that will also give time for your other chars to Regen Mana.
Here is the complementary video of the fight, Run at about 360k TP, pre-global buffs. Low TP = terrible Crit chance on Seo and Alicia, making the fight much harder
Congratulations for making it through and unlocking the next big power ups for your roster, in preparation for many more memorable encounters and challenges.
Cheers!
New Sets Showcase
Here are both Jinwoo and Hunter sides of Vulcan normal with No Blessings showcasing the new sets, both Curse and Blessing at 8 pieces and Greed at 4 pieces.
Jinwoo side
Hunter side
Summary
- New sets are excellent, be careful when salvaging them as level 73 Epic are better than 55 Classic artifacts. Go for 2 or 8 piece sets, Greed can be used at 4 alongside the 4 Solid Analysis set (or a Blessing set if it’s not equipped by your support) until you get 8 pieces.
- Only do Normal if you can clear floor 25, otherwise stick to Easy as more drops is better than Legendary drops.
- Ultimate Damage and Core attack are key for Jinwoo and Alicia, Damage Taken Increased is appreciated too. Always pick offensive buffs.
- Breakers make life easier, try to always have one unless your DPS are extremely strong.
- The higher the TP (Total Power), the more wiggle room you'll have so patience will be key.
- Water is King, the Bosses are all weak to it so keep them hydrated! Cha stays relevant for 25F, girl doesn't want to be forgotten so soon. The Plum Sword is also bae, and will never go out of fashion, so wear it casually (a3 is a big deal).
- You're F2P? Have you heard of our Lord and Savior West Wind the Great? This weapon was so strong it had to be nerfed for global launch, well it's still stronger than most of the SSR weapons available. Video records show that A4 West Wind + A3 Plum Sword can clear Easy mode as full F2P.
- As mentioned before, but if you have the choice between damage and not damage, go for damage. Meilin, Min and Alicia give a bazillion offensive buffs, while healing, shielding and controlling the Bosses. What else could you want?
- Jinwoo Regens his Mana when using Basic Attacks, as such downtime and phase changes are just a nice way to say "It's time to spam left click honey".
- Hunters regen faster when swapped out, so bring out your least mana hungry Hunter during downtime.
- I heard about phase changes, when are they?
- 100 Health bars on Easy and 110 Health bars on Normal.
- Then about 55 and 64 Health bars.
- The big bad Shield is at about 20 Health bars on Easy and 24-25 Health bars on Normal.